R8 Finishing Techniques

This area of the audit has been marked at '1' meaning very little knowledge if not any at all.
__________________________________________________
__________________________________________________
What I have learnt and what I now understand
To begin with I have learnt that a 'Finishing Technique' is a process that is completed to improve a product or a piece of material in terms appearance, properties and quality. I recognise that these are the main principles and reasons to finish a material.
In addition, I now understand that even though there are many different processes and techniques that you can go through in order to finish a piece of material or product, the bottom line is, any material can have a finish applied to it.
Common finishing processes for Wood
I understand that timber products need finishing treatments to protect them from the weather, insect and fungal attack, liquids and dirt. I realised later on that some hard woods actually have natural protection from their own oils and because of this they do not always need protecting by using such processes. I have learnt that there are a few common finishes that you tend to use on woods these are :
I have learnt that regardless of what finish you apply to any piece of wood before finishing you would always go through the same process to prepare the material. Therefore, I now understand that this is common practice and a key principle within any finishing technique. This process consists of the following:
Sand or glass paper is used to remove scratches and other flaws on the surface. The paper must be wrapped around a cork sanding block tightly to prevent damage to the wood, I find it is easier to hold the wood in a vice to get a even surface. I did not realise but now I know that sand paper varies in terms of it's coarse from medium, fine to extra-fine, you can determine the different types through colour and by looking or feeling the piece of paper. To begin with I have learnt that the process begins with a coarser piece and then progressively working down to a finer piece of paper.
Once this is complete the wood is then dusted down to remove any excess pieces of wood and dust. I understand now that this is so important as it insures that your brush does not get dust particles in it causing the finish to be bumpy or to a poor standard. Furthermore, I am aware and I feel it is an important factor to remember is that you can also use Planes for a smooth finish on a piece of wood, and filler to cover up any holes that have been created by pins of nails.
Below are some examples of finishes that I have applied on Wood.
To begin with I have learnt that a 'Finishing Technique' is a process that is completed to improve a product or a piece of material in terms appearance, properties and quality. I recognise that these are the main principles and reasons to finish a material.
In addition, I now understand that even though there are many different processes and techniques that you can go through in order to finish a piece of material or product, the bottom line is, any material can have a finish applied to it.
Common finishing processes for Wood
I understand that timber products need finishing treatments to protect them from the weather, insect and fungal attack, liquids and dirt. I realised later on that some hard woods actually have natural protection from their own oils and because of this they do not always need protecting by using such processes. I have learnt that there are a few common finishes that you tend to use on woods these are :
- French polish
- Oil
- Wax polish
- Varnish
- Paint
- Wood stain
I have learnt that regardless of what finish you apply to any piece of wood before finishing you would always go through the same process to prepare the material. Therefore, I now understand that this is common practice and a key principle within any finishing technique. This process consists of the following:
Sand or glass paper is used to remove scratches and other flaws on the surface. The paper must be wrapped around a cork sanding block tightly to prevent damage to the wood, I find it is easier to hold the wood in a vice to get a even surface. I did not realise but now I know that sand paper varies in terms of it's coarse from medium, fine to extra-fine, you can determine the different types through colour and by looking or feeling the piece of paper. To begin with I have learnt that the process begins with a coarser piece and then progressively working down to a finer piece of paper.
Once this is complete the wood is then dusted down to remove any excess pieces of wood and dust. I understand now that this is so important as it insures that your brush does not get dust particles in it causing the finish to be bumpy or to a poor standard. Furthermore, I am aware and I feel it is an important factor to remember is that you can also use Planes for a smooth finish on a piece of wood, and filler to cover up any holes that have been created by pins of nails.
Below are some examples of finishes that I have applied on Wood.


I have learnt that by using scrap pieces of material and applying a finish to it is a really good way to trail finishes. I found that this was really helpful as it enabled me to get some sort of idea as to how my piece would appear without having to apply the finish to the whole project.
I decided to actually use the varnish in the end. What is always good to remember which I now understand is that you will need to apply several finishes in order it to be fully finished. You must check things like drying times because sometimes it does take a long time. It is always useful to give the paint or varnish for example a stir because if it has been on the shelve for a while some of the oils could start to rise to the top.
Looking back at my work I now realise that the finish I applied was not to the best of standards. There are a few blemishes and brush marks on the top and several bumps which makes it look uneven and not very professional. Whats more, the colour varies for some reason on the wood so I feel that I should have applied another finish to even the colour and remove any uneven areas. A positive point to add is that this is at least I am able to recognise and identify the mistakes I have made because this illustrates that I am learning and engaged with the content and principles of this type of finishing technique.
Common finishing techniques for Metal
I now understand that finishes are applied to Metal in order to protect it just like Wood. Metal can corrode so it is really important to finish a piece to a high standard not only to make it look nice but also to preserve it. I have learnt that the most common finishes that you can apply to metal are:
Below are a few examples of some finishes that I have applied to Metal.
I now understand that finishes are applied to Metal in order to protect it just like Wood. Metal can corrode so it is really important to finish a piece to a high standard not only to make it look nice but also to preserve it. I have learnt that the most common finishes that you can apply to metal are:
- Polish
- Emery cloth
- Paint
- Etching
- Blue and oil
- Fluidisation
Below are a few examples of some finishes that I have applied to Metal.


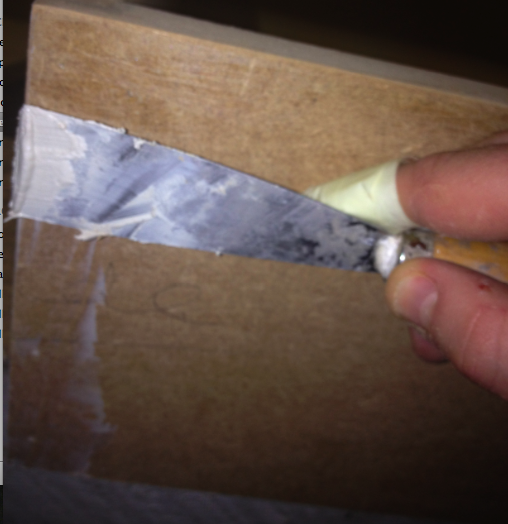
When I was cleaning and finishing the solder on the stain glass window piece, the only thing that I used was a scouring pad, some fairy liquid and warm water. I found that this really got rid of all the dirt and mess from the flux and solder. However, I am aware that you can also apply a liquid that dyes the solder gold but I felt that I wanted to stick to the silver look.
I have also used Enameling as a finish that you can apply to metal and I have learnt how to do this after a student lead demonstration. I am aware that this process can be used on Brass or Copper in this case we used copper sheets of metal. I understand that there are lots of ways to decorate a piece of metal using enamel but to begin with I just used a simple method.
It was really useful to complete actually because I learnt a few things from my mistakes and picked up different tips whilst completing the process, for instance you know when your enamel is almost ready when it is looks like a piece of orange peel (example can be seen in the third picture along above) and also if you leave the piece in the forge for too long then the enamel will become really uneven. I also used a piece of emery cloth and soap to clean away any marks from the heat but I understand that this itself is another technique to finish metal. I feel that although it was a practice run it is a nice little technique to go through and looks great on jewellery!
Common finishing techniques for Plastics
I now have learnt that there are several finishing techniques that can applied to plastic. Through my own experience so far on the course I know that once you have finished working on a piece of acrylic it can get scratched quite easily therefore it is important to clean and finish all of these marks away in order to maintain a high quality appearance/finish.
- Abrasive and Fine Polish
- Fluidisation
- Wet and dry paper
- Plastic coatings
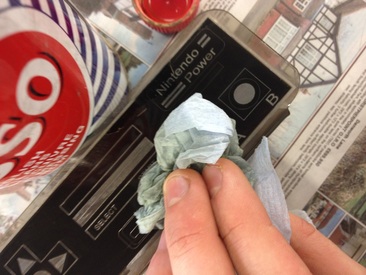
This image shows an example of myself finishing a piece of acrylic. I learnt that it was really important to work somewhere that was well ventilated because the fumes can be quite strong. If you are also working on the piece for long periods of time you should take regular breaks and even wear protective gloves.
For our Materials and Processes module as part of the learning objects and in order to meet the assessment criteria we were supposed to dig deeper into the common concepts and misconceptions when it comes down to applying finishes within school. I feel that it is also important to include these points within this section of the audit because they in turn have supported my overall development and understanding of this area. The following points are factors to make note of whilst applying finishes to materials.
Common concepts with Finishes
Common Misconceptions with finishes
Although I have become more aware and learnt these misconceptions as I have progressed in the course, I know that it is so easy to make these mistakes and evidence of this can be seen in my final piece for the Design and Make module. Despite of this, at least I am able to now understand where I have gone wrong and recognise how I can develop this if faced with the same process.
___________________________________________________
Common concepts with Finishes
- You would always prepare the material before you apply any finish - For example cleaning and sanding the material down
- The material will be dust free and cleaned
- All surrounding areas such as work benches and floor will be free of dust
- Paint brushes and cloths will always be clean before finishing any material
- If painting would for example you would need a few coats to obtain the best possible finish
- Primers or a first layer is always used on metal and wood to get good coverage and density
- There are different primers for woods other materials
- Different water based paints and spirit based paints
- When painting/varnishing you would not use too much paint and use the tip of the brush
- Generally speaking protective clothing would be worn not to damage clothes - For example apron and gloves
- Health and safety would always be put into consideration if using a harmful paint or spirit - For example a well ventilated area, mask to avoid hazardous fumes, and gloves to avoid skin irritation
Common Misconceptions with finishes
- Dirty brushes can create bits of dust and dirt on your finished material
- Students can often apply the wrong finish to the material which can damage the material and often it is irreversible
- If you do not prepare the material properly then you can see marks within the material - blemishes in wood, where the joints are for example. Sanding down in wood is important
- If your painting a piece of wood some students will not apply enough coats of paint to it meaning you do not get good density and coverage
- It is important to go in stages when finishing any material if the stages are completed incorrectly then it can lead to a poor finish. For example with Metal and Plastic polish finishes it is essential to go through grades this means start with a coarse grade of abrasive paper to remove deep scratches, then go onto successively finer grades removing fainter scratches. Wet and dry abrasive papers are usual. When the finest grade paper has been used a metal polish can be used to give the final highly polished effect. A buffing wheel can also be used for the final stages where a calico wheel coated with an abrasive soap removes scratches and polishes the surface
- Often students think that using a bigger brush when paint for example will make the process faster, but it could lead to silly mistakes and cost you more time in fixing it. Always use appropriate sized brushes
- Often students stain their clothes, their hands, work benches, or the workshop floor if they have not protected surrounding areas when applying a finish- Newspaper is really good to lay down when using something which is prone to drip
- In some cases students can become impatient and not wait for the finish to dry properly which could leave finger marks on the piece of material.
Although I have become more aware and learnt these misconceptions as I have progressed in the course, I know that it is so easy to make these mistakes and evidence of this can be seen in my final piece for the Design and Make module. Despite of this, at least I am able to now understand where I have gone wrong and recognise how I can develop this if faced with the same process.
___________________________________________________
Analysis of new gained knowledge and the next step
To begin with this section of the audit was graded as a '1' meaning little knowledge if not any at all, I had some sort of idea as to what a finishing technique meant but I did not know all of the processes that you can take to choose the finish you want and because of this I feel it was a fair grade. Now that I have progressed and had the chance to engage further with this area in my own work and through the workshop sessions I do feel as if I have developed my knowledge more. During this time, I have been quite successful in my learning and other times where I feel I could have improved and become more successful.
I feel that I have been really successful in applying and going through at least one type of process or finishing technique with each material. This has really helped me to understand and remember how different they are to work with and how you can apply finish in various ways. However, I felt that I was good at being able to identify the fact that I was transferring some skills over whilst completing the process, for example brushing techniques or cleaning and preparing material before it is finished. I feel that as a learner it is always important to recognise these principles and be aware of how you are transferring skills across, therefore as a result I do feel that this alone was a successful part of my learning.
Further more, even though I read and researched about the different types of finishes and watched a few tutorials online about how to practice the method to the best and highest standard I learnt so much more whilst I applied the finish myself. I have realised that I have learnt a great deal more whilst exploring and practicing with the tools ect in the workshops so I felt that it was a successful part of my learning and engagement. I also was able to understand and recognising the mistakes that I had made once I looked back at my work. This indicates to me that as a learner I have begun to think more about how I am applying myself whilst using these sort of techniques, the fact that I have spotted the mistakes although are they are not ideal it has made me realise how I can learn from them when faced with something like it again. If I was not aware of the mistakes that I had made then perhaps this would suggest that I have not learnt enough during my time.
Generally speaking during my engagement although I have learnt a great amount about the common finishing techniques and the principles and misconceptions that come with it, I feel that I could have experimented and explored some more examples of this. Even if it is looking at different ways to finish a material using other methods it will be a good way to further my knowledge and skills in this area of the audit and also make me know more about the options I have when finishing a material.
My next step now in this case will be to experiment with other ways in which to finish a piece of material. I want to see if I can learn anything new or more from these unvisited techniques. Also it would be useful to document any examples of finishing methods that I have already used so far but revisited during my projects in semester two. It will be a good way to determine and see whether or not I have actually improved the technique. It is always nice to see how you have developed and improved your skills so I hope to add this later on. Perhaps this is something that I can add to next year, but ideally I would like to do this, this year.
___________________________________________________________________

Further Development
Today in the workshops I conducted a few experiments in finishing techniques using metal and wood, I really learnt some good tips actually so all in all it was a worth while experience and has certainly supported my development and understanding within this area of the audit.
Finishing Metal
Today in the workshops I conducted a few experiments in finishing techniques using metal and wood, I really learnt some good tips actually so all in all it was a worth while experience and has certainly supported my development and understanding within this area of the audit.
Finishing Metal
- After I had finished creating the joint in the hot metal room I then began to file down the burnt marks using a file. I was insured that I was transferring all of the knowledge and skills I had learnt already in terms of holding the tool correctly and positioning myself so that I was getting the best results possible.
- I then began to use a emery and realised that it was quite an effective way of removing the scratches from the metal. I then applied some Brasso to the metal which polished the piece up really nice
- I practiced two finishing techniques - 1 using Spray paint and 2 using paint. I learnt that the paint did not take as long at all to dry whereas the spray paint which is green in the picture took a quite a while.
- I was really impatient at one point and touched the side of the piece which was spray painted - as a result a left finger marks and this is something that I will never do again!
- The paint eventually dried but there were a few stroke marks on the piece so perhaps I need to do another coat or use a different brush?
- An important factor to remember is to insure you have the piece in a well ventilated area with newspaper down so you are not damaging work benches.
This was an interesting experiment to not only go through the processes there are to finish metal but also to see the differences between how spray paint appears and paint.


Finishing wood
Just like my experiment above with metal I used spray paint and paint to see how it appeared and almost reacted if you like with wood.
I learnt that it was really important to apply quite a great deal of spray paint to the wood, in comparison to the metal it seemed to need a great deal more. Perhaps I should have sanded it down for longer?
The aluminum looking paint was great and it almost made the wood look like a piece of metal from a far. It was quite interesting to think about how I could use that to my advantage with any future pieces of work. For example say if I wanted to model an idea but I felt that it would be easier to use wood then I could finish the material using this kind of paint to try and make it appear as close to how the product would if manufactured properly with metal, thus saving time and money . Just like the metal as well I noticed that the spray paint took much longer to dry than the paint itself and I learnt from my lesson and did not touch it whilst it was drying!


Once I waited for the paint to dry I began to think of alternative ways to combine two finishes together to create simple patterns. I felt that masking tape was a really good way to help me block away the piece of the wood which I did not want to spray or paint. Learning from my mistakes I wanted until it was fully dry to reveal the final outcome.


Below are some pictures that show the results of the finished that I applied to the pieces of wood. As you can see they are slightly messy and have not turn out how I envisaged. However, this has been a nice learning curve because it has made me realise how important it is to be careful when you are applying finishes. Perhaps the spray paint was sprayed on too much? Maybe I need to use more masking tape? I think a easy way to correct this is to apply more silver paint with the help of masking tape to get accurate straight lines, maybe I should have done it that way round but then I still would have gained the same results. All in all it has been a nice exercise to practice finishing techniques using a variety of paints and materials.


A point that I mentioned early in the audit. A principle that is always applied when using paint to finish materials. You must stir the paint in order to mix together the oils and any dried bits of paint within the pot. As you can it looked like this when I opened the tin so i ended to stir it to mix all of the chemicals and so forth together.

Professional Year Further Development
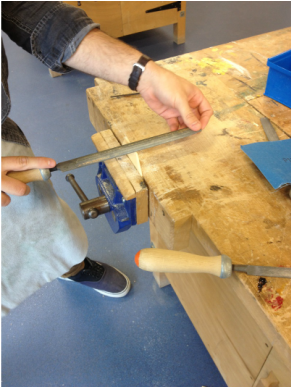
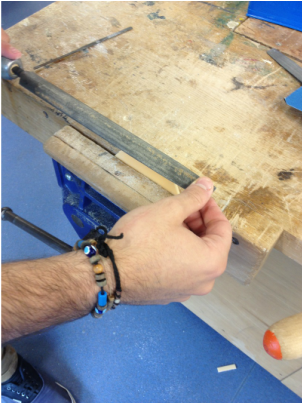
Today I had some further experience with finishing plastic. I have revised that just like finishing a piece of wood you go through similar stages to finish acrylic. This process is called wet and dry and you use the sand paper in stages. The first sand piece you use will be a great deal courser, you can determine this by feeling the paper but also by the number on the back;
Then you can use the polisher to buffer the rest of the piece.
Below in the left hand picture the lower course paper is nearest to the piece of acyclic. The higher course is furthers away and you can see the three stages that you follow.
The right had picture you can see the number of the paper on the back. AKA. 1200C, which indicates that it is a lower course.
- The lower the number the higher the course, for example, the first piece you use will be the number 600.
- The higher the number the lower the course, for example the last piece you use will be the number 1200.
Then you can use the polisher to buffer the rest of the piece.
Below in the left hand picture the lower course paper is nearest to the piece of acyclic. The higher course is furthers away and you can see the three stages that you follow.
The right had picture you can see the number of the paper on the back. AKA. 1200C, which indicates that it is a lower course.


Today I had a little experiment with some finishing techniques using wood as my material.
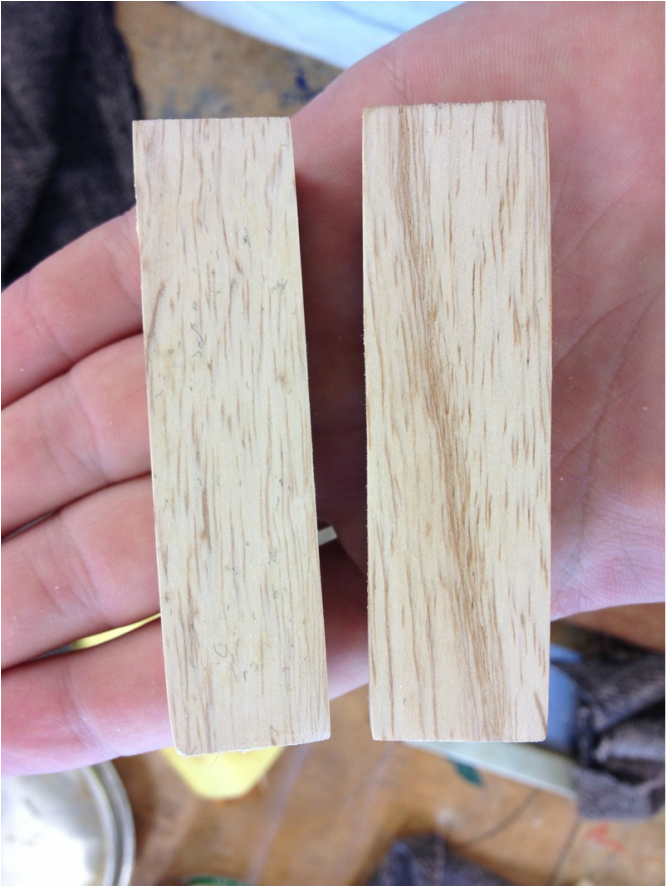
I experimented with wax, varnish some paint. I relearnt today how important it is to prepare any material before you apply the finish. For example you MUST sand down a material as it helps with the quality of the finish, I wanted to how much of a difference this made. I used to piece of scrap wood used sand paper on one piece and on the other just applied the finish, in this example I used wax.
The piece on the left was not prepared properly and you can see quite clearly the differences. This was a nice learning exercise for me and perhaps will be something that I would like to explore using other materials at a later date.
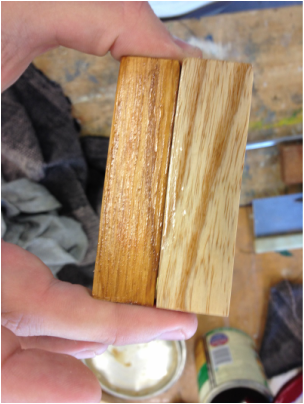
I also used varnish and paint on the scrap piece of wood. Principles such as applying the finish evenly, preparing the wood accordingly, making sure the brush is clean, stirring the finish where all factors which were common during both processes.
Hexagon finish
Today I completed one of the mini tasks which has really helped me to realise the importance of finishing techniques when you are working with acyrlic. I also noticed that you can identify the differences between the finishes by feeling the edges of the plastic. I now understand the differences between CROSSFILING and DRAWFILING.
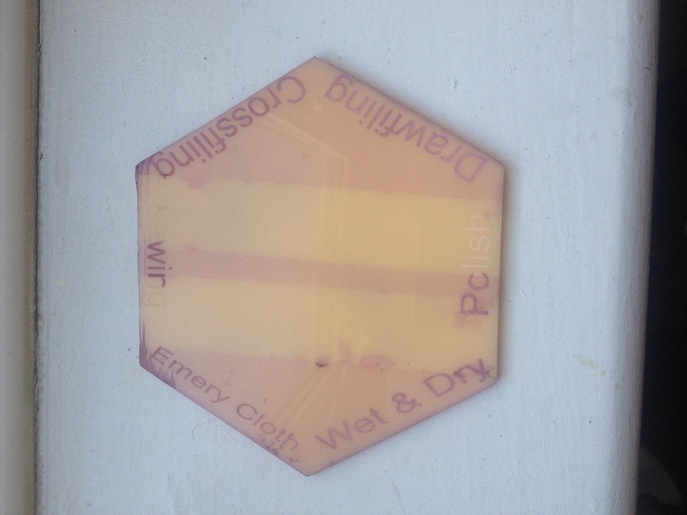
CROSSFILING is where you file vertically ACROSS the material.
DRAWFILING is when you file the material horizontally
