C5 Familiarity with computer aided design and modelling

Computer aided design as an area of the audit shows very strong links to my background. During my degree I was very reliant on using programmes and software in order to design and fabricate a digital product. Despite my current knowledge in this area I can imagine that the software used is completely different to what I am familiar with consequently, I have marked this area as a '1' meaning very little knowledge. Hopefully I will be able to transfer my current knowledge and identify common principles or concepts within the software used which in turn will aid my progression so hopefully I won't take took long to pick it up but we will have to see!
__________________________________________________
My INITIAL understanding of the term 'FAMILIARITY WITH COMPUTER AIDED DESIGN AND MODELLING'...
As mentioned because of my background I know that Computer aided Design or also known as CAD essentially allows someone to use computer software as a process to design and display design-documentation. CAD may be used to design curves and figures as two-dimensional (2D) images or curves, surfaces, and solids in three-dimensional (3D) objects. I would say in terms of modelling, CAD software would be used to model a purposed design, this would model on a much smaller scale in order to save costs and find floors in the design.
__________________________________________________
What I have learnt and what I understand now ...
Having had the chance now to engage further with this area of the audit I most certainly have gained a fair amount of new knowledge. During our taught sessions and by playing around with the different programmes I have been able to identify that there are many advantages of CAD. For me personally CAD has helped me to have a better perspective of the design that I am proposing and it is very accurate as well. It has also opened my eyes to design much more complex and stylish designs because the software gives you so much freedom.
I have already had some experience with 2D design but I wanted to familarise and refresh myself with it so that I could gain even more knowledge.
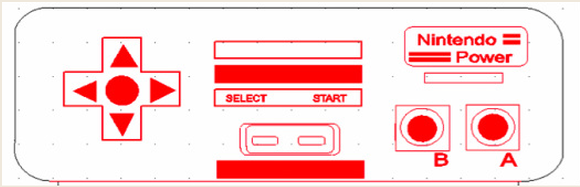
The next few pictures / screen grabs are documentations of a little exercise I set myself, it displays my process using the software and illustrates what I explored and learnt. The purpose of this task was not just to experiment using 2D design but it was also so that I could use it with the laser cutter and as a result it allowed me to learn new skills with a machine as well.
__________________________________________________
My INITIAL understanding of the term 'FAMILIARITY WITH COMPUTER AIDED DESIGN AND MODELLING'...
As mentioned because of my background I know that Computer aided Design or also known as CAD essentially allows someone to use computer software as a process to design and display design-documentation. CAD may be used to design curves and figures as two-dimensional (2D) images or curves, surfaces, and solids in three-dimensional (3D) objects. I would say in terms of modelling, CAD software would be used to model a purposed design, this would model on a much smaller scale in order to save costs and find floors in the design.
__________________________________________________
What I have learnt and what I understand now ...
Having had the chance now to engage further with this area of the audit I most certainly have gained a fair amount of new knowledge. During our taught sessions and by playing around with the different programmes I have been able to identify that there are many advantages of CAD. For me personally CAD has helped me to have a better perspective of the design that I am proposing and it is very accurate as well. It has also opened my eyes to design much more complex and stylish designs because the software gives you so much freedom.
I have already had some experience with 2D design but I wanted to familarise and refresh myself with it so that I could gain even more knowledge.
The next few pictures / screen grabs are documentations of a little exercise I set myself, it displays my process using the software and illustrates what I explored and learnt. The purpose of this task was not just to experiment using 2D design but it was also so that I could use it with the laser cutter and as a result it allowed me to learn new skills with a machine as well.

Before I began this task I had already
learnt from Dean that you can use most images from any source and transfer it into
2D design. If you want to integrate the design with the laser cutter then you
would need to go through a few processes so that the machine will recognise it
and cut accordingly. My first step was to vectorise the image that I selected
from Google.

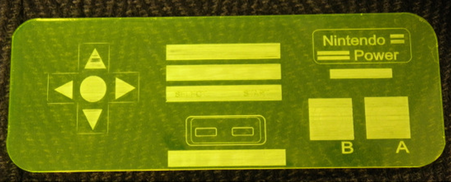
Once I vectorised it I needed to make
it all one colour so it was easy for me to work with. I haven’t found a quick way
to do this yet so for the time being I just went on every individual colour and
changed it to black. I hope to find a quicker way though because it is slightly
tedious and takes up so much time !

I discovered that if I want to work with the shapes individually then I would need to EXPLODE the image. This will separate each shape so that I can edit each object rather than the image selected being a whole piece.
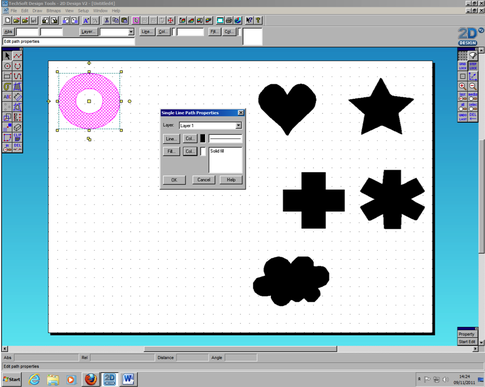
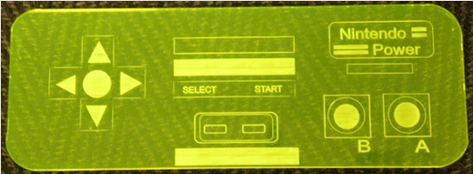
The properties tab helped me to change
the colours of the shapes lines and fill. A really good tip that I learnt was
that when resizing something if you hold down the SHIFT button then it will
keep it really accurate. Other programmes that I have used before will rely on
this principle so I almost guessed it would be the same for 2D design, never
the less it was useful thing to discover.
Here is a screen grab showing my final
stage where I experimented with copying and pasting shapes and also explored
different ways you can engrave something. (PLEASE NOTE this is not the same screen shot of shapes however it gives you an idea)
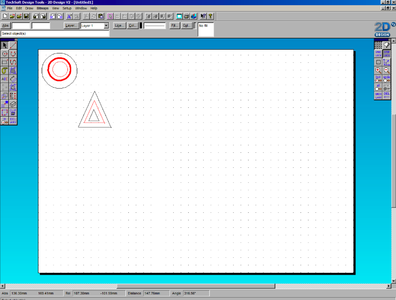
[Dean during a tutorial informed us that the laser cutter will and can engrave something but in order for it to do so you need to communicate this to it. You do this by changing the colour of a line or shape. I have chosen the colour BLACK to cut my shapes and RED to engrave. Prior to this I had no experience in actually engraving something so I decided to play around with the thickness of the engraving using the properties tools. I thought it would be interesting to see the final outcome for future reference. Not only have I learnt new skills but I have also discovered and learnt some golden rules -
There are of course over rules but these are some I have found important for me as a learner.
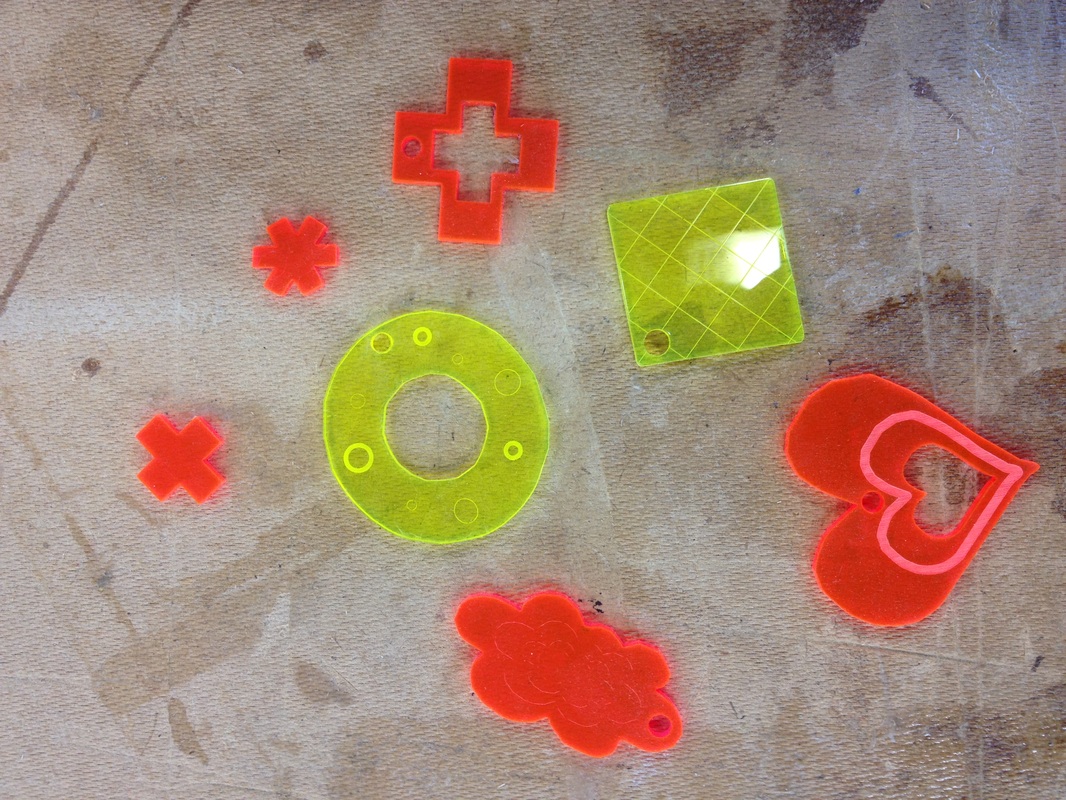
Below are the examples of the shapes that I cut out using the Laser cutter.
[Dean during a tutorial informed us that the laser cutter will and can engrave something but in order for it to do so you need to communicate this to it. You do this by changing the colour of a line or shape. I have chosen the colour BLACK to cut my shapes and RED to engrave. Prior to this I had no experience in actually engraving something so I decided to play around with the thickness of the engraving using the properties tools. I thought it would be interesting to see the final outcome for future reference. Not only have I learnt new skills but I have also discovered and learnt some golden rules -
- Always use the generic red so that the laser cutter understands the file
- Illustrator will not always work and cooperate with the laser cutter
- always separate your cut lines and engraving lines so that you and the machine are able to determine the differences
- insure that you are saving your work all the time as it can get lost !
There are of course over rules but these are some I have found important for me as a learner.
Below are the examples of the shapes that I cut out using the Laser cutter.
I have also had the opportunity to experiment and explore the other CAD software which is available. As it stands we have been introduced to the following software:
I am aware that there are other programmes that schools use such as Prodesktop, and Auto Cad but I have yet use these.
- 2D Design
- Solid works
- Creo Elements
I am aware that there are other programmes that schools use such as Prodesktop, and Auto Cad but I have yet use these.
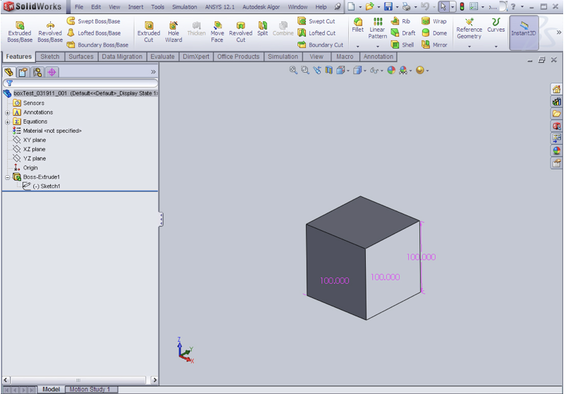
To be brutally honest I am really not too keen on Solidworks by far I have found that 2D Design is so much easier to use. However, I did learn a few things.
I realised that you have a lot more freedom and can create very complex designs because of the fact that it is 3D. I felt that it was a little bit faster than 2D design as it seemed to respond quicker and fixing a problem was faster. What helped me to progress and gain a better understanding of my design was the fact that I could rotate it and view it at different angles - at a later stage if I do need to use this then I think it will allow me get more of a understand about how my work can be produced.
I think I will have to tackle this piece of software again because it really baffles me.
Modelling with CAD
I have now had a chance to model my design using CAD. I wanted to trial the engraving and see how 2D design was going to communicate with the laser cutter. Even though I have already explored engraving in a previous experiment I thought it would be a good idea as I have yet to model my own work using CAD. Below is a picture which was what I sent to the Laser Cutter (the red represent the engraving sections).
This is how the first test piece came out! Soon I realised what I had done something wrong... In the print settings I hadn't clicked raster on the engraving. Therefore, I have now drilled into my head that....
Just from this task I have now realised and learnt that Modelling is SO important. It can save time, money (with materials) and also it allows you to see your project in a 3D form as a object. Additionally, I now also understand that you can make one little mistake on the laser cutter's printing settings and it can really affect the final result.
- CUT LINES (BLACK) - No raster
- ENGRAVING LINES (RED) - Raster
Just from this task I have now realised and learnt that Modelling is SO important. It can save time, money (with materials) and also it allows you to see your project in a 3D form as a object. Additionally, I now also understand that you can make one little mistake on the laser cutter's printing settings and it can really affect the final result.
The end result ---->
By completing this small task it has helped me as well to look at my design in a different perspective and because of this I was able to alter a few things about the design. I was also made aware that some engraving would need to be thicker on the 2D design document because the end result was very faint.
By completing this small task it has helped me as well to look at my design in a different perspective and because of this I was able to alter a few things about the design. I was also made aware that some engraving would need to be thicker on the 2D design document because the end result was very faint.
Not
only did I model my work for my systems and control project to see how
it would turn out but also I wanted to test how I was going to shape and
bend the work. Therefore, I tested this process but used very little
material. I have learnt that modelling is also useful because you can
trial out how you are going to fabricate your final product, but also
using CAD you can alter the size and not use as much material.
Below are two pictures showing the final results.
Below are two pictures showing the final results.


__________________________________________________
Analysis of gained knowledge and the next step
I was faced with this section of the audit with very little knowledge and because of that I graded it as a '1'. Although I have learnt quite a bit about the importance's of CAD and explored software such as 2D design and Solidworks it is such a big area there is a lot more that I need to discover and learn.
Never the less, when engaging with these programmes I have realised that there are certain principles and concepts that they use, with that in mind with a little more practice I will then hopeful be able to transfer these concepts and develop further. These transferable concepts and principles can be seen at the following link. http://benjenkinsmaterialsprocesses.weebly.com/cad.html
One important thing is that I have learnt that using CAD you can create stylish and complex designs, modelling enables you to identify floors in the design and also because the software is so quick you able to make this changes and correct the mistakes quickly.
I would say that I was rather successful in my experiments when exploring 2D design, because I did use it at school I found it reasonably easy to pick up, having said that I think the software is very basic as a programme and aimed for students in schools so perhaps I would be worried if I found it challenging? The things that let me down was when I then transferred the files to the laser cutter there were certain things affected the machine and it took a fair amount of time just trying to fix it. I think that there are little things that will help me improve and be more successful when I am using any CAD software and that is knowing the shortcuts and the basic commands being able to familairse myself with this points can help me develop.
In terms of solid works although I was able to create a shape manipulate it but putting a hole through it it was still the most unsuccessful experiment because I did find it difficult and I know that I will need to address that at a later stage.
The next step in this section of the audit is for me to investigate and engage more with the 3D software and generally improve and explore with the other types of software. I want to be able to know more about solid works the other 3D programmes because all of these programmes can be used with the CAM machines and at least one of the machines will be in a school that I could be teaching in but also it is something that I would like to learn because it seems really interesting and the products that you can create are far more complex.
__________________________________________________________________

Further development within this area
Although I so far have learnt and discovered the importance and advantages of using CAD, as I have explored this area further it has made me more aware and realise even further reasons as to why this is such a key part of Design and Technology and the design process.
I have learnt that CAD has changed the ways designers develop and communicate their ideas - with my initial ideas they certainly were shaped and developed because of the fact that I used these programmes to capture them quickly. I also found that using CAD was a good way to model ideas because sometimes my drawing skills are not entirely great, and if I was modelling ideas I could take it a step further and use textures and colour to add more realism. I think the most important thing that I have learnt through me exploring the area further and within the taught sessions is that CAD programs can determine how the product is likely to fail when in service.
I have also experimented with a few more ways in which to display my ideas using CAD software. Here are some examples of me using, Photoshop, Illustrator, 2D Design, and the Graphics tablet
I have also felt as if I have come to grips more with solid works and found that it is not as bad as it makes out to be! Here are a few screen shots showing a tutorial I followed.
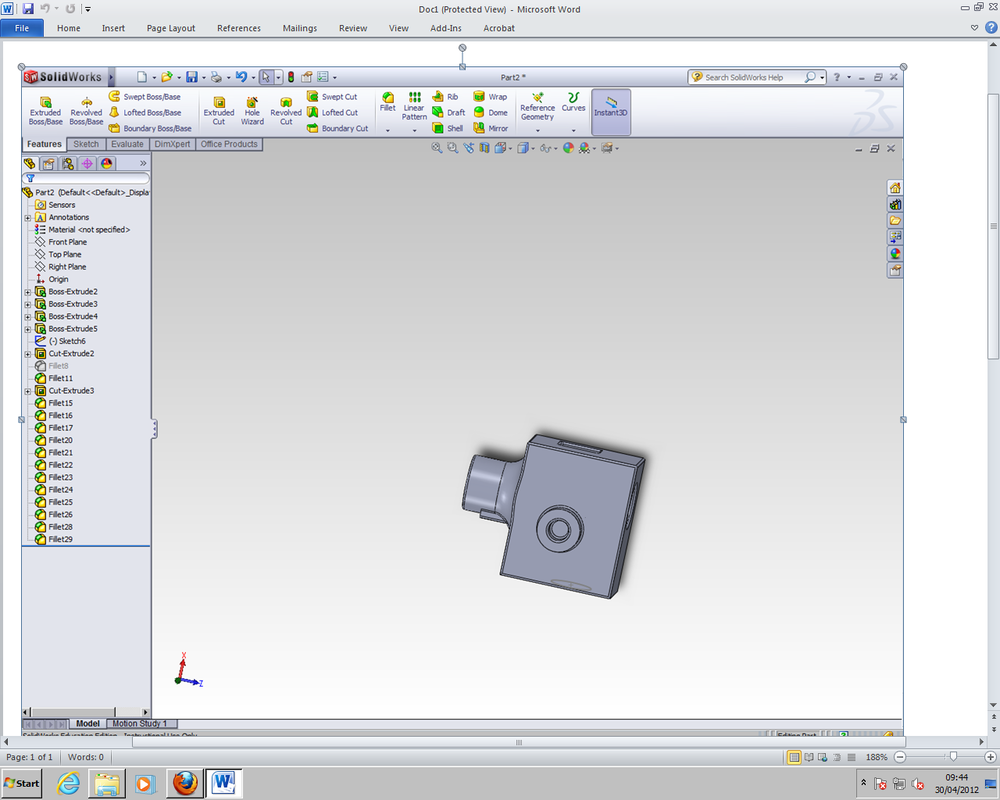
I have not had the time yet to explore any other tutorials in solid works but I have made a note of them here so that if I have time later or next year I will be able to know where to find them!
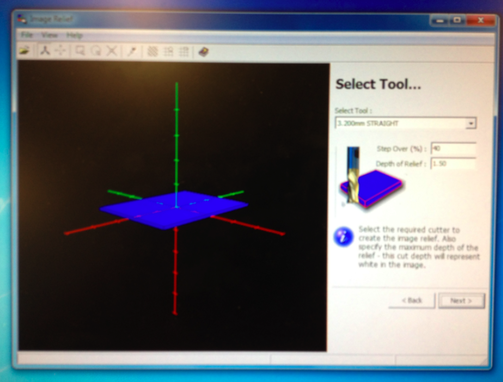
Image Relief
Today myself and Kelly used the router to create some simple engraving pieces with acrylic. Although I am aware that this engagement task is more relevant to computer aided manufacture, Image Relief was the program that we used and is a form of computer aided design software. I did mentioned for my further development that I wanted to explore other types of CAD software and for this reason I thought it would be appropriate to include this as part of my development.
Like all of the software that I have used so far I was able to identify that this programme uses the same principles and concepts of using X, Y and Z axis. It also goes through a step by step process of setting up your piece which in turn prepares it to be workable on the machine. For instance, you adjust the settings on the software of your material so that the recognises the sizes for example. During the time when myself and Kelly were stuck we found the help files really useful as a guide and as a result it supported our learning. We were unsure initially as to what the step over was, but through the help files we now know the step over is the amount the tool overlaps each cut in order to get a smooth finish.
I used solid works again today, even though I do not feel that I have learnt anything dramatically new during this process, it was really good to practice my skills and see how far I have come. I noticed that it did not really take me long at all to create the shape and I understood the principles and what I wanted to achieve very quickly. It was also quite a nice way to see how this piece was going to work on the actual router itself so all in all it has supported my developed.