C7 Construction of working drawings

I have marked this section of the audit as a '1' because I have no knowledge of this area what so ever. During my degree we were never expected to create a working drawing and neither have I had to do something like this whilst I was at school studying Design and Technology. Therefore, it is inevitable that I will have to investigate further into this area to develop my knowledge.
___________________________________________________
INITIAL understanding of the term 'CONSTRUCTION OF WORKING DRAWINGS'...
As I have mentioned I have no idea as to what this area of the audit entails especially when you are referring it to the Design and Technology realm. However, what I can do is give it some sort of guess and I would say that I think working drawings could be sketches of your product or design. In fact, I remember that my old housemate was expected to create working drawings for his degree in architecture so although it may be a bit different to this subject this could link and translate to the same concepts of the term 'working drawings'.
___________________________________________________
What I have learnt and what I understand now...
Well from my initial understanding I do not think I was too far off the meaning of working drawings. We had a session today with Bhav and were introduced to working drawings. Everyone in the class seemed to deal with it fine but for some reason I found it really really really hard! Perhaps I was having an off day but it really got to me but on a plus note I learnt lots of new things within the area.
Bhav said that the term 'Working drawings' can also mean 'Technical drawing' so both of these terms will relate to the same thing. These drawings allow someone to understand how to manufacture a product - I feel that these drawings can also been seen as a set of instructions that you can give to anyone to create a product. It seems that anyone can understand the drawings as they are created in such a way, so in some respect they are like a visual universal language. One important thing to remember is that you must display a scale at the bottom of the page to indicate to the person the measurements and dimensions ect.
Whilst I was trying to suss this area out I learnt pretty quickly that good having working equipment is ESSENTIAL one of the reasons why I was behind initially and found it difficult was because my compass was slightly loose so it did not hold my pencil firm enough. Therefore, I now know that it is imperative to insure that you have the right working equipment and also that your pencil is sharp and suitable (2HB). This pencil allows you to lightly marks constructions lines and also apply more for other areas that you want to make more clear.
I learnt from this exercise that it is important to insure that you have accurate drawings so that the person looking at the piece can understand how to make it this includes dimensions and scale- because of this it has helped me comprehend more about scale and accuracy. Not only is equipment important, whats more is that you have a clear desk and a flat surface area I found myself at points having to clear aware lots of the equipment just so that I was able to have a space to move about. I have learnt how to find a center line and also how to dissect a line as well.
I also became aware that there are several types of views or angles that you can draw a design or product.
There are other words for these angles and views mentioned above, that can mean the same thing but these are the terms that I am most familiar with.
In both my projects for Systems and Control and Design and Make we were required to create working drawings to display good practice. Below you can see the examples.
___________________________________________________
INITIAL understanding of the term 'CONSTRUCTION OF WORKING DRAWINGS'...
As I have mentioned I have no idea as to what this area of the audit entails especially when you are referring it to the Design and Technology realm. However, what I can do is give it some sort of guess and I would say that I think working drawings could be sketches of your product or design. In fact, I remember that my old housemate was expected to create working drawings for his degree in architecture so although it may be a bit different to this subject this could link and translate to the same concepts of the term 'working drawings'.
___________________________________________________
What I have learnt and what I understand now...
Well from my initial understanding I do not think I was too far off the meaning of working drawings. We had a session today with Bhav and were introduced to working drawings. Everyone in the class seemed to deal with it fine but for some reason I found it really really really hard! Perhaps I was having an off day but it really got to me but on a plus note I learnt lots of new things within the area.
Bhav said that the term 'Working drawings' can also mean 'Technical drawing' so both of these terms will relate to the same thing. These drawings allow someone to understand how to manufacture a product - I feel that these drawings can also been seen as a set of instructions that you can give to anyone to create a product. It seems that anyone can understand the drawings as they are created in such a way, so in some respect they are like a visual universal language. One important thing to remember is that you must display a scale at the bottom of the page to indicate to the person the measurements and dimensions ect.
Whilst I was trying to suss this area out I learnt pretty quickly that good having working equipment is ESSENTIAL one of the reasons why I was behind initially and found it difficult was because my compass was slightly loose so it did not hold my pencil firm enough. Therefore, I now know that it is imperative to insure that you have the right working equipment and also that your pencil is sharp and suitable (2HB). This pencil allows you to lightly marks constructions lines and also apply more for other areas that you want to make more clear.
I learnt from this exercise that it is important to insure that you have accurate drawings so that the person looking at the piece can understand how to make it this includes dimensions and scale- because of this it has helped me comprehend more about scale and accuracy. Not only is equipment important, whats more is that you have a clear desk and a flat surface area I found myself at points having to clear aware lots of the equipment just so that I was able to have a space to move about. I have learnt how to find a center line and also how to dissect a line as well.
I also became aware that there are several types of views or angles that you can draw a design or product.
- Front elevation - This shows the front of the work/product/design.
- Side elevation - The side of a piece of work
- Plan - This is in some sense the birds eye view of the design
- Isometric - This gives in some sense gives you more of a realistic view of the design. It shows views from one corner of a piece of work at an angle.
There are other words for these angles and views mentioned above, that can mean the same thing but these are the terms that I am most familiar with.
In both my projects for Systems and Control and Design and Make we were required to create working drawings to display good practice. Below you can see the examples.
Design and Make

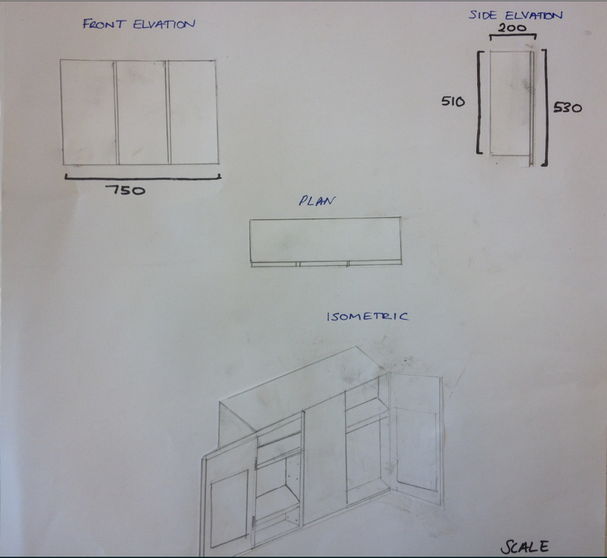
As you can see from here I have created these two working drawings for my cabinet that I made for my Design and Make module. The reason why I have created two sets of drawings is because I changed my design later on in the process and I thought it would be good practice to do it again. You can see that I have not only included things like measurements for the height, width and length and scale, I've also included lines that display hidden or unseen details for example the back of the cabinet. The second time I completed the task I found it much more easier to understand and grasp the concepts but I still find it hard to draw isometrically. I need to explore into this more so that I am more confident and competent in this area. To tackle this I may try and practice these techniques using squared paper instead of plain.
Systems and Control working drawings
I found that creating working drawings using 2D design was SO much easier than doing it by hand. We were marked on our evidence of being able to display our work by exploring other forms of digital aids and as a result this is why my drawings are using 2D. I found that the dimensions were accurate using a tool within 2D design and made life a lot easier and faster. The most crucial thing that I took with me and learnt from this task was that when you have a bit design that has an angle then you would need to indicate to the a manufacture what the angle is that they need to shape it. By putting the angle you can also put a + or a - which indicates some sense of leeway/freedom with the angle.

___________________________________________________
Analysis of gained knowledge and the next step
I was introduced to this part of the audit with no knowledge at all and that is why I graded the section as a '1'. Now that I have engaged more with the construction of working drawings further I have evidently learnt a great deal but I still find it quite challenging as an area within Design and Technology.
I can understand the importance, basic principles and a little bit of the do's and don'ts, however the isometric views really baffle me and also I found that sometimes being able to translate the correct measurements was quite hard at first. I think the measurements, scale and dimensions are something that I found hard because it involves a bit of maths perhaps? But I know that if I go back to the basics or someone tries to explain it to me again I'll be able to understand it more. Although these points are aspects that have been slightly unsuccessful, I successfully managed to create my working drawings using 2D design and I was pleased that I was able to do it digitally because I did find easier.
I know that it is important to take things one step at a time but it really is something that I found hard and it made me feel really frustrated. What obviously started me off on the wrong foot was having bad equipment, I know a workman should never blame his own tools but the compus being loose made it harder for me to use the equipment so in this case I think I can be safe to say this. Although, I was unsuccessful at this point, I learnt the that it is vital to have good equipment and for that reason in the future I will apply this knowledge by insuring that I am checking everything because I use it. Sharp pencils and clear work space for example are things that are going to help create better drawings.
The next step at this stage within my development is to explore technical drawing even further, I feel that it is an area of weakness still and I find it a bit daunting that I need to teach this to students so for my own sanity I want to be able to be comfortable with the area. Therefore, I am going to practice more with perspective angles, Isometric, Oblique, Orthographic as well as single and two point perspective drawings I can then document this within the audit and reflect upon my progress at a later date.
____________________________________________________________________

Further development
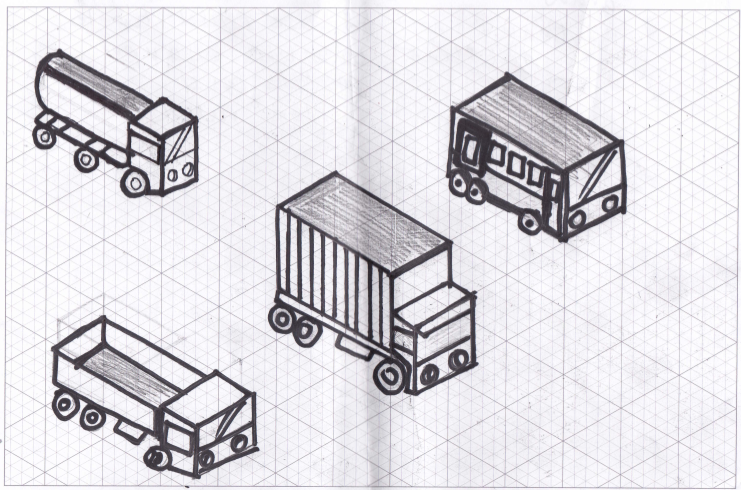
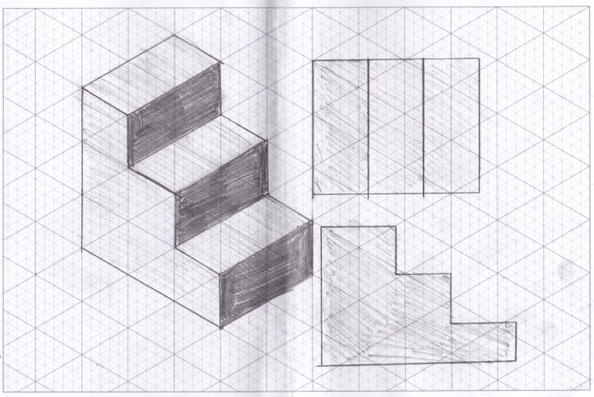
As we have progressed in the course this year we have had several more taught sessions where we have been able to practice our working drawing techniques. I have found these sessions extremely beneficial because like anything as a learner the more you practice the more you get better at a skill.
I decided to practice my drawing techniques using squared paper and a sharp pencil, here are some examples of the drawings I created. ( Isometric, Oblique, Orthographic as well as single and two point perspective. During this task I was able to learn more about how to give the perspective of depth whilst drawing, I realised the importance of using the correct equipment, I stupidly went over my drawings with a black marker pen which made it look chunky and messy. Also I used a rule and because it was quite old it marked the paper slightly so I now understand that even your rule must be right in order to produce good drawings.
I decided to practice my drawing techniques using squared paper and a sharp pencil, here are some examples of the drawings I created. ( Isometric, Oblique, Orthographic as well as single and two point perspective. During this task I was able to learn more about how to give the perspective of depth whilst drawing, I realised the importance of using the correct equipment, I stupidly went over my drawings with a black marker pen which made it look chunky and messy. Also I used a rule and because it was quite old it marked the paper slightly so I now understand that even your rule must be right in order to produce good drawings.
These are some notes that I have made in class and it has really helped me to understand this area of Design and Technology further.


I have found that my skills in this area of the audit has vastly improved and hopefully evidence of this can be seen within this section of the audit.