R5 Marking out techniques

This area of the audit has been marked at '1' meaning very little knowledge if not any at all.
__________________________________________________
__________________________________________________
What I have learnt and what I now understand
Before I started this course I had no idea of what it meant by the term 'marking out' but now through my own engagement, through the modules set and within the taught sessions I am now more aware and understand the importance of this within a Design and Technology context.
We had a taught session today with Dean and he demonstrated some key principles that you should consider whilst marking out. Now I understand the term ' Marking out' means:
A process of transferring shapes and lines to a piece of material. It is the first step in the manufacturing process and it provides guidance for cutting, bending or shaping.
I learnt that accuracy is vital when marking out as it allows the product to assembly and function correctly. I now know that instead of using center meters (CM) in Design and Technology millimeters (mm) are the preferred unit of measurement and you would use a steel rule to support your accuracy. Further more, I discovered that other tools such as a micrometer and vernier calipers are also tools that can help you be accurate within your work. In addition, I now understand that selecting appropriate tools depending on the material your working with is also oaf the essence. For example you would never use a pencil to mark plastic or wood!
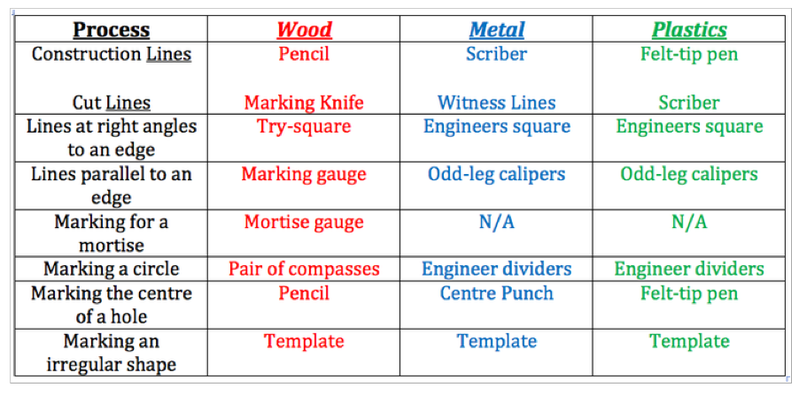
This is the most important aspect that I have learnt and realised from the demonstration today: Marking out tools and techniques will vary depending on the material that you use and it is important to insure that you are not only using the right tools with the correct material but also using the tools in the correct way. Below I have created a table that shows the common principles that you would apply when using different materials and tools to mark out a piece of material. Hopefully this table will be something that I can refer back to in my own learning and further engagement but also during my teaching.
Before I started this course I had no idea of what it meant by the term 'marking out' but now through my own engagement, through the modules set and within the taught sessions I am now more aware and understand the importance of this within a Design and Technology context.
We had a taught session today with Dean and he demonstrated some key principles that you should consider whilst marking out. Now I understand the term ' Marking out' means:
A process of transferring shapes and lines to a piece of material. It is the first step in the manufacturing process and it provides guidance for cutting, bending or shaping.
I learnt that accuracy is vital when marking out as it allows the product to assembly and function correctly. I now know that instead of using center meters (CM) in Design and Technology millimeters (mm) are the preferred unit of measurement and you would use a steel rule to support your accuracy. Further more, I discovered that other tools such as a micrometer and vernier calipers are also tools that can help you be accurate within your work. In addition, I now understand that selecting appropriate tools depending on the material your working with is also oaf the essence. For example you would never use a pencil to mark plastic or wood!
This is the most important aspect that I have learnt and realised from the demonstration today: Marking out tools and techniques will vary depending on the material that you use and it is important to insure that you are not only using the right tools with the correct material but also using the tools in the correct way. Below I have created a table that shows the common principles that you would apply when using different materials and tools to mark out a piece of material. Hopefully this table will be something that I can refer back to in my own learning and further engagement but also during my teaching.
Fortunately, one of our modules (materials and processes) challenges us as learners to dig deeper into this area of Design and Technology, this in turn has helped me within my own development and I am now more aware of the key principles of marking out, the common concepts and the misconceptions in schools.
The common principles that I have learnt are:
I have also learnt and now understand that with these common concepts there are also misconceptions and I now understand and have learnt that misconceptions may include:
I have also learnt that there are common tools that you tend to use whilst Marking out and the following images show these tools.
The common principles that I have learnt are:
- Always hold the tool by the handle
- All of the wooden handles are used to mark wood
- All of the metal handles are to mark metal
- Always use the tool on a flat service or a straight/true edge to insure accuracy
- A steel rule, inside and outside calipers will always be used for every material to measure
- Cutting fluids, grease, chemicals should stay way from the wooden handles
- The engineers square has been hardened and tempered enabling it to be a lot thicker which means when you use a Scribber it is not going to slip whereas with the wooden handles the metals are a lot thinner
- On all materials you need be able to make the distinction between construction lines and cut lines
- Use a marking guage on wood and plastics or odd-leg calipers on metal and plastics to mark lines parallel to the true edges
- Mark out as clearly as possible to avoid mistakes
- Always shade the waste accurately and clearly
- Both the centre and dot punches are used in the same way. A ball pein hammer is used to tap the head of the punch and this delivers enough force to the point of the punch to put a small indentation into the surface of the material.
- When marking out metal use little arrows
- Look at the marking out from a birds eye view
- Both the centre and dot punches are used in the same way
- When marking with metal you can use Engineers blue to mark the surface of the material the markings appear a lot more clearer this way – when the work is finished the dye can be easily removed with white spirit and a rag
- A ball pein hammer is used to tap the head of the punch and this delivers enough force to the point of the punch to put a small indentation into the surface of the material
I have also learnt and now understand that with these common concepts there are also misconceptions and I now understand and have learnt that misconceptions may include:
- When using the engineer divider if you have not punched dent using a dot punch or centre punch then the leg at the centre of the arc can slip
- The leg at the centre of the arc can be prevented from slipping by centre punching a dent in the centre of the circle
- The dot punch is a lighter and thinner version of the centre punch and is used basically for the same job. However, it is more accurately as the dot produced is smaller
- Using an incorrect tool with the wrong material can mark it
- It is vital to use the correct marker on a material. EG you would not use a Scriber on Plastic, as it will scratch the material
- Sometimes it can be difficult to see marks clearly which are drawn on polished metals – (engineers blue can fix this)
- Working out millimeters not cm (10mm equaling 1cm)
- Measure from the end of the rule (baseline)
- Pencils need to be sharp when drawing lines onto the material
- Looking after the tools will allow you to mark and measure accurately
I have also learnt that there are common tools that you tend to use whilst Marking out and the following images show these tools.


Applying this process within my own work
So far I have used the process of Marking out only with Wood. Even though before hand I learnt about the principles and now understand the importance of marking out, I did in fact learn a few things whilst I was applying this process within my own work.
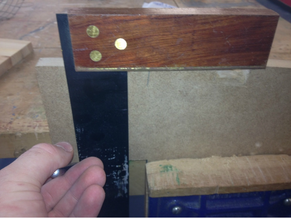
First of all it made me realise how important it was to start off on a true edge. The true edge must be a completely flat surface, from this point you can then start to measure or mark out your work.
I now understand that without a flat surface to work from, all of your measurements will be inaccurate. Often you can indicate your true edge by marking the wood.
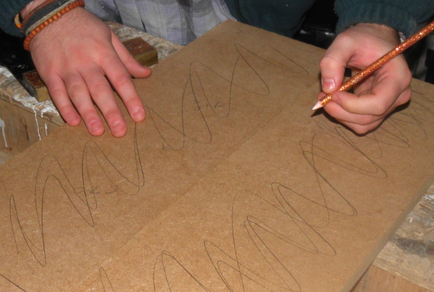
I also learnt that it was really important to show which piece of material was going to be your waste. This avoids confusion and mistakes but also make its clearer for yourself as you are working. This is standard good practice to demonstrate whilst completing this process in any Design and Technology project. To illustrate the waste of the material I just used my pencil and scribbled a few lines.
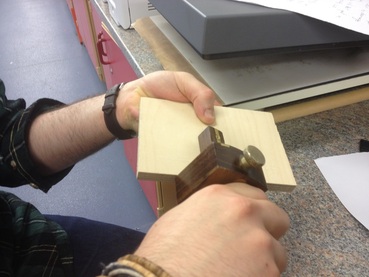
Further more at the start of the course, I found it really difficult to get the hang of using the mortise gauge to mark out wood. I knew that it was an important process for me to know and understand, so I used a scrap piece of wood and continued to practice. In the end I did get the hang of it and thought of it in another way.
I looked at the tool as a motor bike handle, you line the tool up against the wood and turn it like a motor bike when you want to score the piece of wood. So I found slightly twisting it or turning just like you would on a motor bike allowed me to have more control over the tool and the lines much more visible and neater. This certainly has helped me within my development and I am glad that I have tackled this tool and feel comfortable now in using it!
__________________________________________________
Analysis of new gained knowledge and the next step
When I first started this course and approached this area of the audit I had not prior knowledge or understanding as to what 'Marking Out' meant within any kind of context. As a result, I marked this area as a '1' which means little knowledge if not any at all, I still feel that this was an appropriate grade but now that I have had time to learn more about this process I am much more comfortable and have certainly learnt and understand more. During my learning I have felt that I was successful at times, but there were other moments when I was not as successful as perhaps initially envisage.
When Dean explained how important it was to use the correct tools with the correct material, I wanted to then go away and find a digestible way to display all of this information because I knew not only was it important but also it was quite a lot to remember. As a result, I decided to make a table which demonstrated the common tools that you would use for each material whilst marking out, I have always been a visual learner and find things much easier to look at if they are marked in categories or in colours. I found that by creating a table like this not only displayed all of the information clearer for me to understand it also was a really good source that I can use in the future during my teaching or if I was marking out again in my other projects. Therefore, I would say that this was a successful part of my learning which supported my development and deepened my understanding of the importance of using the correct equipment.
I noticed that I was also most successful during my engagement as I was able to identify the common concepts and misconceptions. I know that principles are so important with any content that you are leaning or teaching and being able to make these transferable links not only allows the content to become much clearer it also enables you to translate the content in a better and clearer way in you teaching. I think I do learn more by playing and experimenting with materials and tools so it is something that I am certainly going to take into account in the future. Reading books is also a good source for learning and I did have a look at some books and the internet to help me understand and recognise these principles and concepts for marking out but it wasn't until I actually put them into practice and applied them within my own work that I then realised how important they were and why they are principles in the first place. Additionally, I felt that I have been quite successful in my learning as well by recognising little hints and tips to facilitate my learning and techniques, for example I struggled at first using the mortise gauge but I got the hang of it and tried to think of an analogy to help students in the future if they themselves were struggling.
During my development and learning within this area of the audit although I feel I have come a long way I still have not explored other materials when marking out. I think that in order to help me further my understanding and practice these techniques it is crucial for me to undergo this in my next stages. Perhaps this is one aspect that has been slightly unsuccessful, I have not yet had the chance to develop my skills in other materials and as a result although I understand which tools to use I am unaware of how they differ.
Therefore, for my next stages in my further develop within this area of the audit, I would like to put practice marking out techniques using another material apart from wood so that I am able to broaden my knowledge and understanding. I would also like to see if I am able to pick up anymore tips or anything that is going to help me in the future as a teacher when marking out.
_____________________________________________________________________

Further development
To further my knowledge and understanding in this area I mentioned that I wanted to find out any more tips or tricks that can help me in the future when marking out.
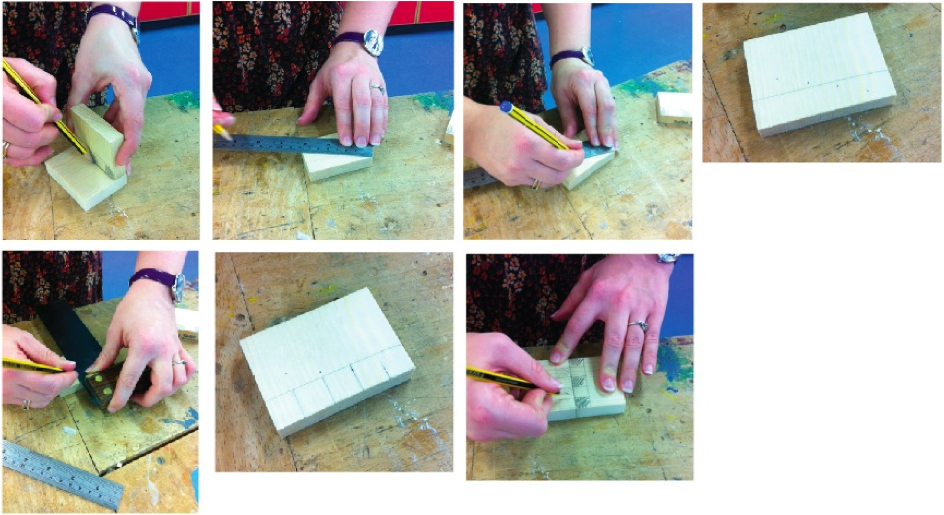
Well today we had a really good demonstration on finger joints from one of the candidates applying to be a technician. I almost learnt a new way to mark them out but the point was to insure accuracy as always when marking out. So first of all instead of trying to work out how you were going to split the piece of wood into equal combs and fingers a better way that we were shown was to set a number that divides equally by 5, 7 or 9. We were given a piece of wood and were told to measure the depth of the material onto the another piece of wood by holding it square on the top.
We then used a steel rule and diagonally measured until the edge was in line with 75mm. This basically meant that there would be five combs which measured 15mm, so we marked 15mm intervals and marked a line using the correct tools.
The great thing about this that we learnt and now I understand is that instead of repeating the ruler process again, you can just hold the two piece flat and use a tri square again to make the lines on the second piece of wood. What was important thought was to indicate the waste so that you could see how the joints would slot into place. I found that this was a nice little technique to remember in the future but most important it insured that everything was extremely accurate.
Below are some pictures of this process. I couldn't find the images that I took so I have used one of my course mates pictures instead!
To further my knowledge and understanding in this area I mentioned that I wanted to find out any more tips or tricks that can help me in the future when marking out.
Well today we had a really good demonstration on finger joints from one of the candidates applying to be a technician. I almost learnt a new way to mark them out but the point was to insure accuracy as always when marking out. So first of all instead of trying to work out how you were going to split the piece of wood into equal combs and fingers a better way that we were shown was to set a number that divides equally by 5, 7 or 9. We were given a piece of wood and were told to measure the depth of the material onto the another piece of wood by holding it square on the top.
We then used a steel rule and diagonally measured until the edge was in line with 75mm. This basically meant that there would be five combs which measured 15mm, so we marked 15mm intervals and marked a line using the correct tools.
The great thing about this that we learnt and now I understand is that instead of repeating the ruler process again, you can just hold the two piece flat and use a tri square again to make the lines on the second piece of wood. What was important thought was to indicate the waste so that you could see how the joints would slot into place. I found that this was a nice little technique to remember in the future but most important it insured that everything was extremely accurate.
Below are some pictures of this process. I couldn't find the images that I took so I have used one of my course mates pictures instead!

When I was looking through a book today I also came across a really useful section which discussed basic rules for marking out wood, metal and plastics. I found this really helpful and although some of these are principles that I have already looked at and mentioned I felt that it was a really concise way to display this information. The book is called Design and Technology by Colin Carborn, Ian Mould and John Cave and here is a picture of the section.
Marking out using Plastic
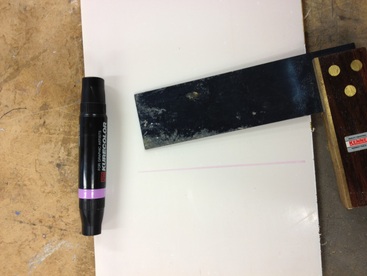
To broaden my knowledge and skill in this area of the audit I decided to practice some marking out techniques using plastic because at the moment I have only used wood.
I learnt that plastics compared to wood are a great deal softer which means that more care should be taken when handling them. When I was marking out this material I thought that it would be a good idea to keep the protective sheet on so that it avoided any damage to the material.
When marking out wood I would use a pencil but with plastic I knew that it would not be suitable. Using a felt tip or some kind of ink pen I found that it was a great deal easier to rub off any mistakes that I had made during the process. The same principle applied for when I marked waste but also I learnt that if you are marking out areas that will need to be drilled by using some kind of tape it helps prevent the build up of heat and stops the drill from skidding on the smooth surface of the plastic.
I am glad that I have had a go at marking out using acrylic as a material. It has made me realise that what ever material you use the underlining principles are the same and can be applied for example showing the waste, or marking a cut line, however the tools change and the technique can change as well. Even though I did this learn during my early stages it was useful to see this first hand whilst experimenting with the material.