R1 Classification & structure of materials

This area of the audit has been marked at '1' meaning very little knowledge if not any at all.
__________________________________________________
What I have learnt and what I understand now
Obviously I am very aware of the three different types of materials that we tend to use in Design and Technology and within the real world however, I have never really considered factors such as how they are formed or the structures of each material. I would guess that this area of the audit relates to how they are formed through Science, and how they are created in the manufacturing process so that we are able to use them.
So far we have had some group presentations on Woods, Metals and Plastics and these have supported this area of the audit. It has certainly helped me to understand some of the differences between Hardwoods and Softwoods or Non-ferrous and Ferrous metals. I have also been able to learn more about structures of materials and this has enabled me to make clear what this area of the audit entails.
Wood
In regards to wood as a material I already knew that there are Hard and Soft woods but I was not aware of the difference in terms of structure and also how to determine the actually differences.
Hardwoods
To begin with I have learnt that Hardwoods come from trees that have broad, open leaves and their seeds are contained in fruit. The majority loose their leaves in the autumn. I now understand that common examples of Hardwoods would be Oak, Ash, Elm, Beech, Birch.
Softwoods
I have also discovered now that softwoods come from trees that have needles and their seeds are contained in cones. They are usually evergreens and therefore do not loose their leaves. I have learnt that these types of wood grow faster than hardwoods and are mostly softer to work with and less expensive. We learnt that common examples of softwoods would be Pine, Fir, Spruce, Cedar.
The key principle here that I now understand and have identified is that whatever type of wood you are working with, all timbers will require protection against rotting and fungal disease. In addition, a vital factor to always remember is that the terms Hard and Soft only refer to the leaves, seeds and structure of the trees so if you are working with a hardwood it does not mean to say that the wood will be heavy in weight and hard to work with. I have learnt this because when I was using Balsa wood to model some ideas I thought it was a soft wood because it was really light and very easily shaped, but I was told by Bhav that it was a hardwood and because of this it has made me realise that this is a really important principle to remember.


But what is the structure of wood?
I know that wood is categorised according to it's molecular structure and how the cell structure is formed, but I wanted to find out more about the structure of wood and how it grows.
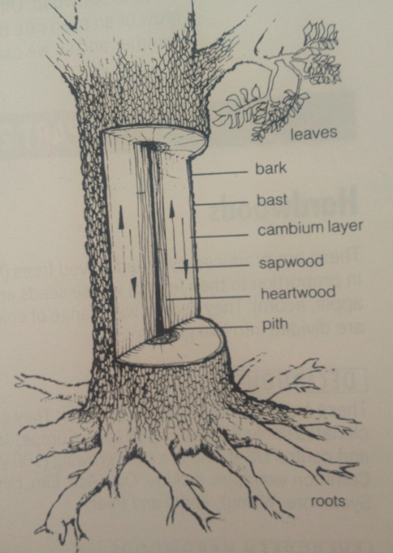
This cross section has really helped me to understand more about the structure of wood as a material. I now know that each part of a tree is important for it to grow and every section has some sort of job.
Roots - These absorb the water and mineral salts, and make crude sap.
Sapwood- This carries crude sap to the leaves
Leaves- These create plant food through the process of photosynthesis. In this process sugars are formed out of water (from the sap) and carbon dioxide (from the air) using energy to absorbed by chlorophyll from sunlight.
Bast -This carries plant food down from the leave to all parts of the tree.
Medullary rays- Carries plant food from the blast into the cambium later, sapwood and heartwood, and store it.
Sapwood - is the living part of the tree. It consists of cellulose cells which have thin walls capable of absorbing moisture from the roots, and plant food to grow.
Heartwood- is the commercially most useful part of the tree. It consist of cells which have become clogged with gum and die. They are stronger, more durable and more resistant to insect and fungal attack than, sapwood, and provide the strength to support the tree. A young tree consists mainly of sapwood but as it grows it makes heartwood. Waste products are stored here.
Pith- is the center of the trunk consisting of the original sapling, from which the tree grew, and is often soft.
Bark- is a protective covering to protect the tree from damage and extremes of temperate. It is made from the outer layers of bast as they die, and consists of a soft inner layer which expands as the tree grows and a hard outer layer.
I now realise that Wood is anisotropic which means its structures and properties vary in different directions its compressive and tensile strength acting parallel to the grain is greater than the strength perpendicular to the grain.
I know that wood is categorised according to it's molecular structure and how the cell structure is formed, but I wanted to find out more about the structure of wood and how it grows.
This cross section has really helped me to understand more about the structure of wood as a material. I now know that each part of a tree is important for it to grow and every section has some sort of job.
Roots - These absorb the water and mineral salts, and make crude sap.
Sapwood- This carries crude sap to the leaves
Leaves- These create plant food through the process of photosynthesis. In this process sugars are formed out of water (from the sap) and carbon dioxide (from the air) using energy to absorbed by chlorophyll from sunlight.
Bast -This carries plant food down from the leave to all parts of the tree.
Medullary rays- Carries plant food from the blast into the cambium later, sapwood and heartwood, and store it.
Sapwood - is the living part of the tree. It consists of cellulose cells which have thin walls capable of absorbing moisture from the roots, and plant food to grow.
Heartwood- is the commercially most useful part of the tree. It consist of cells which have become clogged with gum and die. They are stronger, more durable and more resistant to insect and fungal attack than, sapwood, and provide the strength to support the tree. A young tree consists mainly of sapwood but as it grows it makes heartwood. Waste products are stored here.
Pith- is the center of the trunk consisting of the original sapling, from which the tree grew, and is often soft.
Bark- is a protective covering to protect the tree from damage and extremes of temperate. It is made from the outer layers of bast as they die, and consists of a soft inner layer which expands as the tree grows and a hard outer layer.
I now realise that Wood is anisotropic which means its structures and properties vary in different directions its compressive and tensile strength acting parallel to the grain is greater than the strength perpendicular to the grain.

Metal
I now understand that just like Wood you also find two different types of Metal. Pure metals and alloys
Pure Metals
We learnt that these metals are made from one single element or one type of metal. They are not mixed with any other metals. For example, pure aluminium or pure copper is an example of a pure metal. In terms of it structure this means that it only has one type of atom within it.
I have also discovered that these types of metal are often expensive and have poor working properties - Gold and Silver are very expensive types of metal especially when pure.
Alloy
These are a mixture of two or more metals that create a new type of metal with improve proprieties and characteristics.
An important principle to understand is that there are also two different groups of Alloys: Ferrous and Non-Ferrous metals.
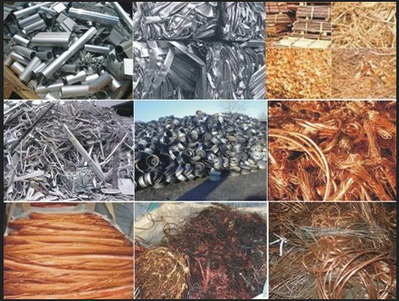
Ferrous Metals
I have learnt that these types of metals are made mainly of iron with small amounts of other metals or other elements added, to give the required properties. Almost all ferrous metals are magnetic. A common example of a ferrous metal would be Steel.
Non-Ferrous Metals
These do not contain iron and therefore are not magnetic. Also examples of such metals would be aluminium, copper, zinc, lead, tin.
I have also learnt and discovered that generally speaking ferrous metals tend to corrode and therefore need some form of protection against corrosion whereas, non-ferrous metals do not tend to corrode in the same way. Also, I now know that both ferrous and non-ferrous metals can be subdivided into two further categories: pure metals and alloys.
I now understand that just like Wood you also find two different types of Metal. Pure metals and alloys
Pure Metals
We learnt that these metals are made from one single element or one type of metal. They are not mixed with any other metals. For example, pure aluminium or pure copper is an example of a pure metal. In terms of it structure this means that it only has one type of atom within it.
I have also discovered that these types of metal are often expensive and have poor working properties - Gold and Silver are very expensive types of metal especially when pure.
Alloy
These are a mixture of two or more metals that create a new type of metal with improve proprieties and characteristics.
An important principle to understand is that there are also two different groups of Alloys: Ferrous and Non-Ferrous metals.
Ferrous Metals
I have learnt that these types of metals are made mainly of iron with small amounts of other metals or other elements added, to give the required properties. Almost all ferrous metals are magnetic. A common example of a ferrous metal would be Steel.
Non-Ferrous Metals
These do not contain iron and therefore are not magnetic. Also examples of such metals would be aluminium, copper, zinc, lead, tin.
I have also learnt and discovered that generally speaking ferrous metals tend to corrode and therefore need some form of protection against corrosion whereas, non-ferrous metals do not tend to corrode in the same way. Also, I now know that both ferrous and non-ferrous metals can be subdivided into two further categories: pure metals and alloys.
But what is the structure of Metal?
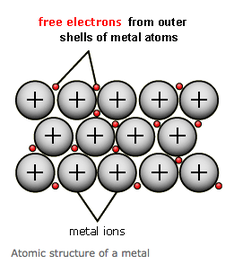
I have started to explore further about the structures of metals and have learnt that metals are large structures of atoms that are held together by metallic bonds, large but also variable numbers of atoms are involved however it depends on the size of the piece of metal.
I now know that metal atoms are arranged to make a crystal lattice which gives metals particular properties and determines it's uses.
I have discovered that metal crystals are made up of positive metal ions surrounded by a sea of negative electrons and they are closed packed which means they fit as many atoms as possible into the available volume.
I now understand as well that the bond between these atoms are so strong that it takes a great deal of energy in order to separate them. As a result it means that metals have very high melting and boiling points and are a strong material.
This was a really good link from Bitesize that has helped me come to terms with the structure of metal and develop my subject knowledge:
http://www.bbc.co.uk/schools/gcsebitesize/science/add_ocr_pre_2011/chemicals/metalpropertiesrev1.shtml
Plastics
We have also had presentations on plastics and like all of the other materials they cover a large amount of content. I have noticed that there are a few common concepts that have seemed to have cropped up whilst I have been learning about the classification and structures of materials.
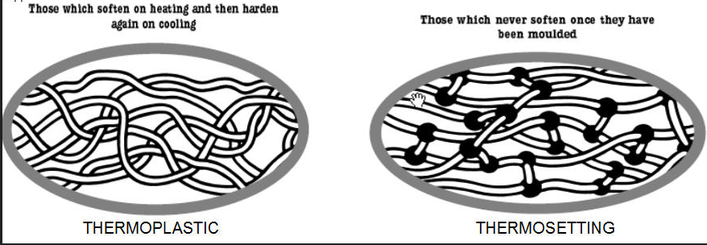
I have realised that these materials are always split into two types of families For instance, the two types of plastics are either thermoplastics or thermosetting plastics.
Thermoplastics
When this type of plastic is heated and reshaped the atomic bonds between the molecules are weakened. This allows the molecules to slide, move, and re-align themselves into new positions. Once these new bonds have been formed then they will stay in that shape when the plastic cools down. If you re-heat and re-shape these types of plastics though this will allow further re-shaping or it will return to its original form or shape. Common examples of Thermoplastics would be acrylics and polythene.
The term 'plastic memory' is referred to when describing a thermoplastics ability to return to their original state after reheating.
Thermosetting plastics
This type of plastic can also be heated and reshaped and the atomic bonds will almost start to behave in the same way as thermoplastic molecules if put through this process. I have learnt that to be formed they need to go through a curing stage. During curing molecular links are formed between the original long chain molecules. This is known as cross-linking. However, once the new bonds are forms they will stay this way, they can not be re-heated or re-shaped, therefore a useful material for products that need to keep their shape and be resistant to heat.
Below you can see the differences in terms of structure
I have identified and feel that The most important thing to remember is that unlike wood and metal, plastic is not natural materials they are man-made. However, I am aware that there are commonly known and natural plastics that are come in forms resins such as amber, rubber, bitumen or animal horn and shell.

But what is the structure of Plastics?
I now understand more about the structure of plastics, the presentation helped me but I needed to go away and find out more about it myself.
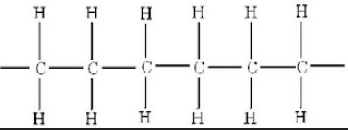
I have learnt that all plastic materials are made up of many long chain molecules and these are called POLYMERS. These will consist of a 'backbone' of carbon atoms with other types of atoms attached to it. These could be either hydrogen, oxygen, chlorine, or nitrogen atoms. Every type of plastic has different arrangements of atoms attached to the main backbone and a plastic material will have many thousands of individual polymer chain which help together by the atomic forces between the chains.
Some important and key terminology that I must remember Monomers are small molecules and a polymer is a large molecule
This picture shows an example of the atomic structure polythene.
I now understand more about the structure of plastics, the presentation helped me but I needed to go away and find out more about it myself.
I have learnt that all plastic materials are made up of many long chain molecules and these are called POLYMERS. These will consist of a 'backbone' of carbon atoms with other types of atoms attached to it. These could be either hydrogen, oxygen, chlorine, or nitrogen atoms. Every type of plastic has different arrangements of atoms attached to the main backbone and a plastic material will have many thousands of individual polymer chain which help together by the atomic forces between the chains.
Some important and key terminology that I must remember Monomers are small molecules and a polymer is a large molecule
This picture shows an example of the atomic structure polythene.
___________________________________________________________________
Analysis of new gained knowledge and the next step
When I first approached this area of the audit it was graded as a '1' meaning little knowledge if not any at all. Hopefully, I have now been able to show evidence of my development and further understanding through my own engagement and learning within this section. So far I would say that I have been able to tackle this new content well, as a result I have learnt a great deal and understand more about the relevance of the area within a Design and Technology context. However, during my learning processes and exploration although I feel as if it was generally successful there are other times where I was least successful.
During this time I found that Bitesize was a really good source to help me understand the differences between Softwoods, and Hardwoods, and Non-Ferrous and Ferrous metals and so forth. In some respects this was a successful aspect of my learning because it almost sped up the process as I knew where to go to help me learn, as a result I did not waste time looking for other sources to help me develop. During my learning I felt that I was successful when I was able to identify some key principles for instance ' No matter what type of wood, Hard or Soft every material needs to be protected against rotting and fungal disease. I feel that as a learner such principles are important to identify because as a future teacher it is vital to be able to translate knowledge over for students to understand and these principles are often factors that support development.
Furthermore, I felt that it was useful for me to look at visual images that displayed the structures of the materials. I know that as a learner I understand things more visually and as a result once I saw these examples the content became much more clear. I would say that this would also be another element that was successful during my learning- finding other sources that display content visually are always going to be useful for people who have different learning techniques.
Generally speaking I do not feel that I was unsuccessful in my learning or during this time of engagement. However, if I was to think of something that I could improve or perhaps tackle for my further development, I think that this would be to dig deeper into a particular structure of a material. Even if I was to learn more about how they form and think of a quick task for myself to do in order to display more competence, ultimately if I am going to do this, it will enable me to help my students so much more in the future to come to terms with the content at hand.
Therefore, my next step now will be to concentrate on a material and dig deeper to see if I am able to translate content in another way.
___________________________________________________________________

Further Development
I have decided to focus on Plastic structures in order to further my knowledge in this area of the audit. I know that it is such a wide subject to cover so I want to focus on a small area of it and see if I can find another way to display the content to help me as a learner but also as a further teacher.
A perfect opportunity has risen to help me develop my understanding of the structures of Plastic, for our use and apply module as a group we taught a lesson on Plastics to our fellow course mates. The lesson mainly focused on how plastic is formed and how it can be recycled, but a big part of our presentation was based on how the atoms/molecules are mixed together to form the material. Our first approach was to cover and explain the Science behind what happens, however in order to display the information clearer we decided that it would be a good idea to make small animations showing the process visually. This process demonstrated a MONOMER turning into a POLYMER. In this case the animation showed a Polymer of ethene.
The Youtube clip below shows an example of the process through the animation
Not only did we show these animations in class, we also asked the students to in groups create monomers. They were given 4 tooth pics and some plasticine in order to recreate the process. Not only did the student engage with the material but it also was another factor that helped to contribute to their deeper understanding of the structures and properties of plastic.


Above are some screen shots of the presentation.
We received some very good feedback after class about the animations and the task set with the plasticine. Many of the students said that they were a good and clearer way to display the information across to new learners and it also made them think about the processes more whilst playing with the materials provided.
In conclusion, I feel as if this has been a good source of engagement within this area of the audit and it has certainly made me think of other ways in which I can put across the structures of wood and metal in my future classes. I feel that by playing around with the content and looking at other ways in which to teach the principles to a class is not only going to make teaching it more interesting but can effectively help students engage and learn more from the content and lessons.

