R10 Heat treatment

This area of the audit has been marked at '1' meaning very little knowledge if not any at all.
___________________________________________________________________
What I have learnt and what I now
First of all I did not realise but understand now that when you refer to the term 'Heat Treatment' it can also mean 'Hot Metal' which is a term that I am more familiar with so far on the course.
I have learnt that when you apply a heat treatment process to some metals you are effectively changing properties and therefore it can be a process which makes metals more suitable for processes or for the jobs in which they have to do. For example, a piece of high carbon still being used to make a cold chisel must be annealed or softened so that it can be shaped and then hardened and tempered so that it can cut other metals. I am aware now and recognise that there are various types of heat treatment processes or techniques. I now know that the most common methods used in schools are:
In the session today we were also taught that Hardening and Tempering are also two other common processes used in schools.
I understand now that hardening increase the hardness and strength of the material. You would tend to harden a a material to create things like cutting tools, springs or hard wear resistant surfaces. Tempering removes the extreme hardness and brittleness from hardened steel and it makes it tougher so that it can be used. By increasing the tempering temperature it reduces hardness, but increases toughness and the final compromise between hardness and toughness depends on the purpose for which the material will be actually used for.
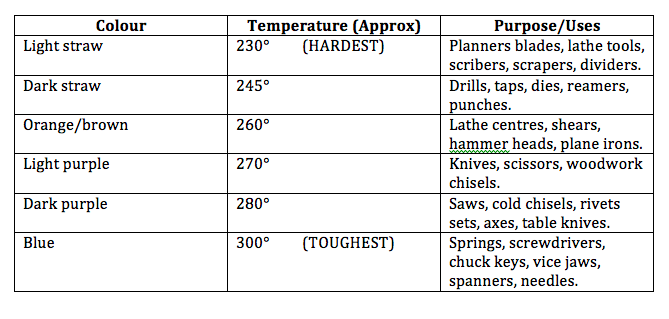
Below the table shows a useful tempering guideline which displays different colours, temperatures and uses for when you heat the material. Dean and Bhav has taught us most of these examples so far but some of which I have learnt through my research and thought it would be a good idea to create some sort of visual to help me remember the principles.
First of all I did not realise but understand now that when you refer to the term 'Heat Treatment' it can also mean 'Hot Metal' which is a term that I am more familiar with so far on the course.
I have learnt that when you apply a heat treatment process to some metals you are effectively changing properties and therefore it can be a process which makes metals more suitable for processes or for the jobs in which they have to do. For example, a piece of high carbon still being used to make a cold chisel must be annealed or softened so that it can be shaped and then hardened and tempered so that it can cut other metals. I am aware now and recognise that there are various types of heat treatment processes or techniques. I now know that the most common methods used in schools are:
- Annealing/Softened - which makes the metal as soft as possible to relieve internal stressing and to make it easier to shape.
- Brazing- Brazing is a way of bonding materials together, a filler metal is used and heated at melting point to combine the material.
- Soldering (Soft and Hard) Soldering is a type of brazing which works at lower temperatures. Soft soldering is used to make permanent joints and is the normal way of joining electronic circuit components. The solder flows into the heated metal along the joint, distributes itself by capillary action, and grips the two pieces together when it all cools.Hard solder works is used for stronger joints.
- Welding -Joins together metal pieces or parts by heating the surfaces to the point of melting and fixating them together for example by hammering or Forging.
In the session today we were also taught that Hardening and Tempering are also two other common processes used in schools.
I understand now that hardening increase the hardness and strength of the material. You would tend to harden a a material to create things like cutting tools, springs or hard wear resistant surfaces. Tempering removes the extreme hardness and brittleness from hardened steel and it makes it tougher so that it can be used. By increasing the tempering temperature it reduces hardness, but increases toughness and the final compromise between hardness and toughness depends on the purpose for which the material will be actually used for.
Below the table shows a useful tempering guideline which displays different colours, temperatures and uses for when you heat the material. Dean and Bhav has taught us most of these examples so far but some of which I have learnt through my research and thought it would be a good idea to create some sort of visual to help me remember the principles.
So far during our taught sessions we have had few demonstrations on some the heat treatment processes. They have been really useful and I personally have learnt a fair amount and during this time I was also able to identify three common concepts and principles that you follow when you work with hot metal. I noticed that there are generally three stages that you go through these are:
Although I am very aware and understand that in terms of the outcome each process is going to be slightly different however the above bullet points would the generic concepts that you would follow.
Later on today I also learnt that these three stages mentioned above also can be transferred and referred to when you apply a heat treat called Annealing. These are common principles and concepts that never change and relate to the specific type of material you use when annealing;
I do understand that it is so important to stick to these guidelines and principles because this can effect your overall piece of material you are working on.
Part of our materials and processes module we have been expected to dig deeper and learn bout the main common concepts and principles with Heat treatment in schools. This has been useful to learn as it has supported my development and understanding within the section of the audit. I am now aware and have learnt that these common concepts and principles are:
I also understand that there are common misconceptions in schools with heat treatment processes and these are the following misconceptions that I have recognised and learnt through my own research and during the taught demonstrations.
__________________________________________________
- Heat the metal (Each metal will have a different temperature)
- Keep it at the specific temperature for the required amount of time
- Cool the metal in the correct way to enable the desired properties
Although I am very aware and understand that in terms of the outcome each process is going to be slightly different however the above bullet points would the generic concepts that you would follow.
Later on today I also learnt that these three stages mentioned above also can be transferred and referred to when you apply a heat treat called Annealing. These are common principles and concepts that never change and relate to the specific type of material you use when annealing;
- Mild steel- is heated to a bright red colour, then soaked for a short time, and left to cool slowly
- Tool steel- is heated a to bright red colour, soaked for a short time, and left to cool very slowly in hot ashes. The slower the metal cools the softer it will be.
- Cooper- is heated to cherry red or dark orange colour and quenched in water
- Gilding metal - is heated to a salmon pink colour and quenched in water
- Brass - is heated to a dull red colour and left to cool
- Aluminum- is covered in soap, heated gently until the soap turns black and then left to cool.
I do understand that it is so important to stick to these guidelines and principles because this can effect your overall piece of material you are working on.
Part of our materials and processes module we have been expected to dig deeper and learn bout the main common concepts and principles with Heat treatment in schools. This has been useful to learn as it has supported my development and understanding within the section of the audit. I am now aware and have learnt that these common concepts and principles are:
- In every process when heating the metal you always try to identify the colour of the metal when it is being heated. The colour will be the indicator as to when it has reached it's correct temperature. For example with brass it reaches a dull red
- The tip of the flame is always used for each process as it is the hottest and will heat the material faster
- Whatever process you use, you would heat around the material as well as focusing on the material itself to ensure all the material is heated effective. Generally the materials around it would be blocks and bricks
- Putting a sign to indicate that the bricks are hot due to recent use - A simple hot sign can avoid any nasty burns and injury for the next user
- The taps are colour coded with Red representing the Gas and Blue representing the Oxygen
- It would be good practice to turn off the gas and power after you complete a process as you then are not relying on the main power and gas proving system
- There are different types of flux's however they both facilitate the joint and make it stronger and it directs the solder to run wherever it goes
- The main reasoning behind the whole process in general is modify and manipulate the properties of materials as well as hardening and softening
- The higher the temperature the softer the metal the easier the manipulation
- For each process good practice in terms of Health and Safety would be displayed - Wearing appropriate clothing to protect yourself from injury
- The process of Brazing and Soft soldering use similar concepts yet there is a big difference in the temperatures used to heat the material
- Soft and Hard soldering again use similar concepts however Soft melts at 200°C and Hard solder's melting point is 625°C
- Generally speaking the processes collectively are not too complex
- You can virtually join any dissimilar metals
- The bond line can be very neat in appearing displaying a nice finish
- The joints are strong enough for most non-heavy duty use applications.
I also understand that there are common misconceptions in schools with heat treatment processes and these are the following misconceptions that I have recognised and learnt through my own research and during the taught demonstrations.
- Sometimes students may add to much water to make the flux
- The Flux used is dependent on the temperature that you are working with but sometimes this can be forgotten by pupils
- Some students will be careful when manoeuvring material especially when it is hot and consequently this may lead to burns and injury - particularly a metal at black heat that might not appear to be hot
- That brazing and soft soldering are the same kind of process because they use the extremely similar methods yet different temperatures are required and students may find this confusing at first if not explain properly
- Sometimes clay bricks are used and they should not heated as they can disintegrate violently
- Ceramic chips, bricks and blocks remain hot for a considerable time after the heat, if a sign has been removed sometimes a user could forget about this and not leave any sign to the next user and as a result this could lead to injury
- Not every material has the same process
- Using a foreign piece of metal in a forge can cause bad fumes
- Some metals are not cooled down properly
- The quenching of hot metals can cause scalding if not handled appropriately
- Students may also think that hot metal work is a process used just for hardening and that metal can only be heated once and bent whilst hot
- Sometimes students do not apply the heat treatment correctly. For example if steel is heated until it glows red and is quenched and it could cause a piece of material to become hard, brittle which means it is likely to break or snap if put under great pressure. If steel is heated until it glows red and is quenched in clean water immediately, it becomes very hard but also brittle. This means it is likely to break or snap if put under great pressure
- In annealing even though mild and tool steel are heated to a bright red heat and soaked for a short time, mild steel is left to cool slowly and tool steel is left to cool very slowly in hot ashes, - as it makes it softer
- In Brazing if a student completes badly brazed joint it can look very similar to a good join and this will have low strength causing the piece to potentially snap in the long term.
__________________________________________________
Analysis of new gained knowledge and the next step
When I first approached this area of the audit I had no past experiences or prior knowledge in this type of process within a Design and Technology context. As a result I marked the area as a '1' meaning little knowledge if not any at all, since then I would say that I do feel much more comfortable with this section and certainly have been able to develop my understanding further. In retrospect, I can now see that there have been points where I have been successful as learner and other points where I know I could have improved and potential developed my knowledge even further.
The taught sessions lead by Dean on some of the heat processes were really good as an introduction to the areas, whilst the demonstrations were being lead I insured that I was making careful notes. Later that evening I found myself looking over these notes but also reading books and looking at sources like Bitesize to help me within my development and understanding. I feel that this aspect of my learning process was really successful and ultimately has helped me to recognise certain principles. This will be a habit that I will continue to practice during my time on this course, I feel that even though making notes is useful as a source to look back on, I felt that whilst the information was fresh in my mind it would be a good idea to read more about it, to insure that I did not forget any vital points. Therefore, I would say that a successful part of my learning process was to re-read my notes and look at other sources to help me develop and build on them.
I also feel that by recognising and identifying certain concepts and principles in any process or technique conducted in Design and Technology is an important part for any development and is something that can support further learning. These principles are almost like guidelines that you can stick to whilst completing a process or even teaching the process to students. It was so important for me to identify and understand them because I know it will help me as a learner but also allow me to translate the important parts of the content to pupils. Breaking the content down in digestible chunks and bullet points also allowed me to learn and take in all of the information in at a good pace. I have noticed that I can quite easily become overwhelmed if I am overloaded with too much information like anyone to be honest, but tackling the content one bit at a time is really important. Therefore, to conclude my points I would say that I feel as if I have got used to looking out for these principles and misconceptions, and the fact that I am still able to recognise them shows to me that I am engaged and stimulated by and with the content and as a result it has been a successful part of my learning stages.
Creating a very simple visual aid has also been a nice part of my learning process within my time so far. I was slightly confused at the different colours to look out for as well as trying to remember all of the correct temperatures so I thought it would be useful to create some sort of table showing the principles to remember and look out for when completing such processes in heat treatments. Now that I have progressed in the course I know more about how I learn and I find that by creating tables and posters, it ultimately not only acts as a source for me to look back on but also insures that the information is drilled into my brain!
Generally speaking I do feel as if I have learnt a great deal so far about the different processes and the principles, concepts and misconceptions that they come with. However, I do feel that it is good to build knowledge up by watching demonstrations, reading books, looking on the internet or viewing online tutorials but how can I actually illustrate to myself how much of this I've actually learnt? The point that I am trying to make is that I need to be demonstrate that I have learnt these new skills by actually engaging with some of the processes and as of yet I have not displayed any evidence of this. I would say that this is a unsuccessful part of my learning process.
This leads me to my next step. I feel that what I must do in the next semester or by the end of the second year is actually show some evidence of myself applying these techniques and using heat treatment processes within my own work or general engagement through the workshops.
__________________________________________________

Further Development
Today I had a little go at Brazing, even though I had previously watched a demonstration presented by Dean I really felt as if I had learnt more by practicing the process myself. It also enabled me to be reminded of the certain principles that are applied whilst completing this method of heat treatment and also it allowed me to recognised and understand more about why there are common misconceptions that occur.
Below are a few pictures showing the process that I went through to create my joint.


- First of all I used two pieces of steel to join together, the first thing that I did before anything was to prepare the metal using an emery cloth.
- I learnt that it is good practice to bend the end of the Brazing rod so that you know which end is going to get hot and which one you will be holding.
- I made up some flux to begin the process of joining the material together. Now I understand more about how important it is to be careful with the amount of water you put into the flux. You do not want it to be runny, a good or ideal texture would be to make it so it resembles thick cream. I also learnt that the flux is important because not only does it help bond the materials together but also it gets rid of the impurities.
- Before I turned the Brazing torch on and started to join the material I knew it was important to prepare the metal in place.
- At first I started to apply the Flux on to the metal using the Brazing rod, I felt that it was not as effective so I decided to use a lolly stick which was a great deal easier and helped to spread the Flux out evenly.
- I re-learnt today that the bricks are so important within any heat process as they reflect the heat which then helps to heat the metal up. I also remembered that I needed to wait for the metal to turn red.
- I found myself wanting to put the flame as close as possible to the pieces of steel in order to speed up the process of waiting for the metal to heat up. I am aware that this is a common misconception because this does not speed up the process. I understand now that the hottest part of the flame is where the blue cone shape is.
Looking back at the joint that I have create although it was my first time properly experimenting with this process I now know that I could have used more flux to create a stronger bond. Also I could have kept the heat going for longer and use more bricks to help with this process. However, I am glad that I experimented with the technique because even though it may not be the best example of a Brazing joint the principles are there and the process now makes much more sense to me and furthermore I have learnt from what I have done wrong and will use these next time.


Heat Treatment using plastic
Today in the workshop I wanted to have a experiment with applying heat treatment to plastic as it was a process that I was yet to discover. Below are some images that I have captured demonstrating my time exploring this process.
A few things that I have learnt that are important principles to be made aware of:
These are all of the things that I have learnt because some of them were in fact mistakes that I had made. It was a useful experience to go through and perhaps a nice project for students to do in school.
Today in the workshop I wanted to have a experiment with applying heat treatment to plastic as it was a process that I was yet to discover. Below are some images that I have captured demonstrating my time exploring this process.
A few things that I have learnt that are important principles to be made aware of:
- Make sure you have the plastic layer protecting your work and away from the heater
- Insure you set the machine to not go beyond a certain temperature
- Set the time
- Do small practice runs to see how it will turn out - I realised that you might need more time if your using a bigger or thicker sheet of material
- Be careful not to burn yourself!
- Make sure you have a clear space
- Take the paper off slowly - you do not want to ruin the piece.
These are all of the things that I have learnt because some of them were in fact mistakes that I had made. It was a useful experience to go through and perhaps a nice project for students to do in school.