R6 Joining techniques

This area of the audit has been marked at '1' meaning very little knowledge if not any at all.
__________________________________________________
__________________________________________________
What I have learnt and what I now understand
So far we have only had a few taught sessions on joints, these demonstrations focused on joining metal however, I now have realised that we have certainly used them within the modules set and during our experimenting time in the workshops. Now I can understand and have learnt that joints are a fundamental asset for any product.
I am aware that the majority of products that are made from more than one piece of material that we tend to use and see on a day to day basis, include joints. I understand now that the process of joining materials together is completed during the manufacturing process and I know that joints enable you to disassemble a product but obviously this will be dependent on the type of joint you use.
Initially, I thought that the principle behind joining materials together was only to create permanent fixings or to strengthen a piece, however I have now learnt that joints can also be used to enhance the appearance of a product.
Through my own research I now know that joints can be split up into two different categories: Permanent joints and Temporary joints. I realised that this is quiet similar and links to the same concept that you apply when you are deciding what type of component to use when you are building your project. In fact I discovered that they share almost the same meaning. I discovered the following:
Permanent joints
These joints are intended to stay put. I now know that some common examples of these joints would include things like adhesives, nails, rivets or even one of the heat processes such as brazing, soldering or welding (used in metals). Therefore, in theory if these type of joints are fabricated to a high standard they will not be able to be taken apart.
These joints are intended to stay put. I now know that some common examples of these joints would include things like adhesives, nails, rivets or even one of the heat processes such as brazing, soldering or welding (used in metals). Therefore, in theory if these type of joints are fabricated to a high standard they will not be able to be taken apart.
Temporary joints
These types of joints are examples of screws, nuts and bolts and these enable you to disassemble the product if required. Therefore, you can always remove these type of joints providing you have the correct equipment.
These types of joints are examples of screws, nuts and bolts and these enable you to disassemble the product if required. Therefore, you can always remove these type of joints providing you have the correct equipment.
Joining techniques for Wood, Metal, and Plastic
I have learnt that joining techniques can be applied and practiced on all types of materials that we use in the workshops. Even though I recognise that these techniques vary depending on what you want to achieve and also the type of material that you are using, I have noticed that they they all have some common concepts and cross overs between them. For instance, every type of joint that you complete on any material it is vital that the fixing is accurate, you want it to be strong and have a snug or tight fit. Therefore, good joint preparation is essential in all cases to ensure that joints are of a high quality. Another principle would be that you always work with a true and face edge.
Joints in Wood
Now that I have researched this area further using the internet and books to support my learning I now understand that there are many types of joints techniques that you can use in Wood! First of all I learnt that wood joints are used in a wide range of products from furniture to picture frames the method used for joining wood will depend on the function, strength and quality of the product but can be split up or classified into three groups:
- Carcase or Box construction
- Stool construction
- Frame construction
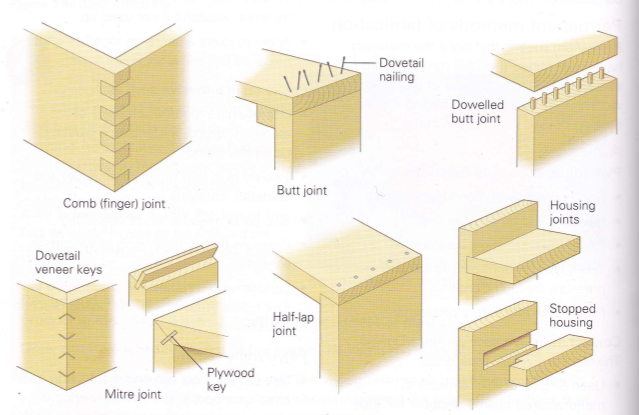
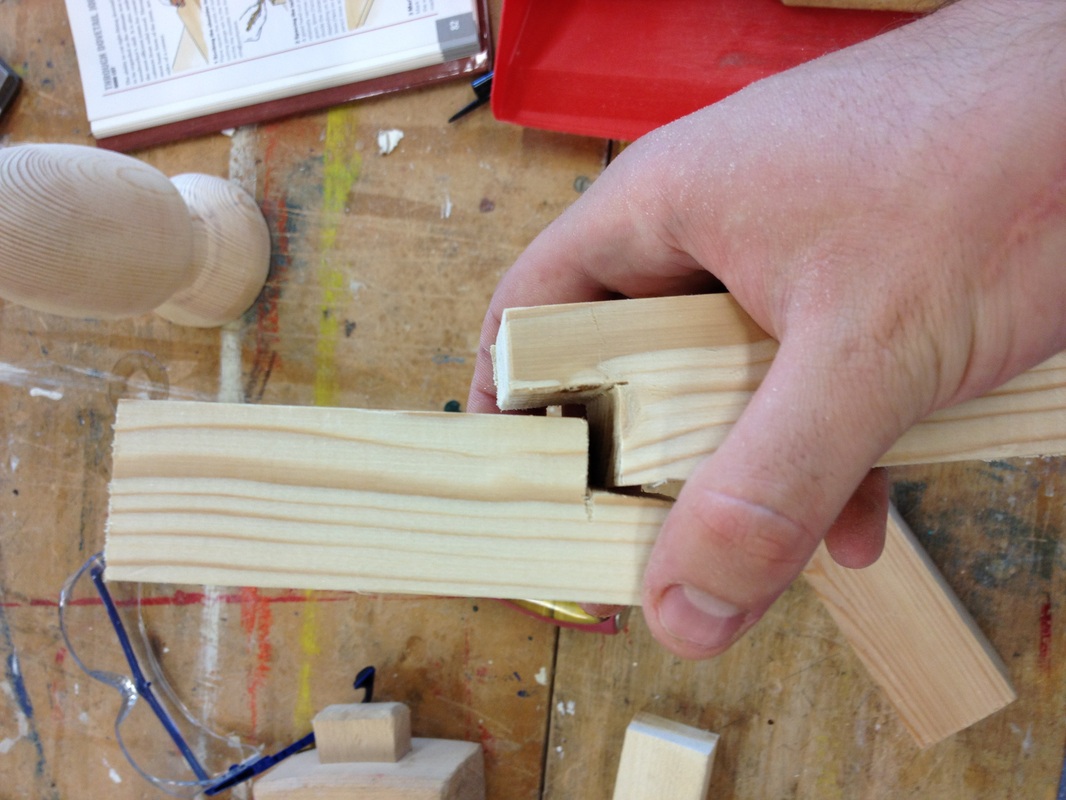
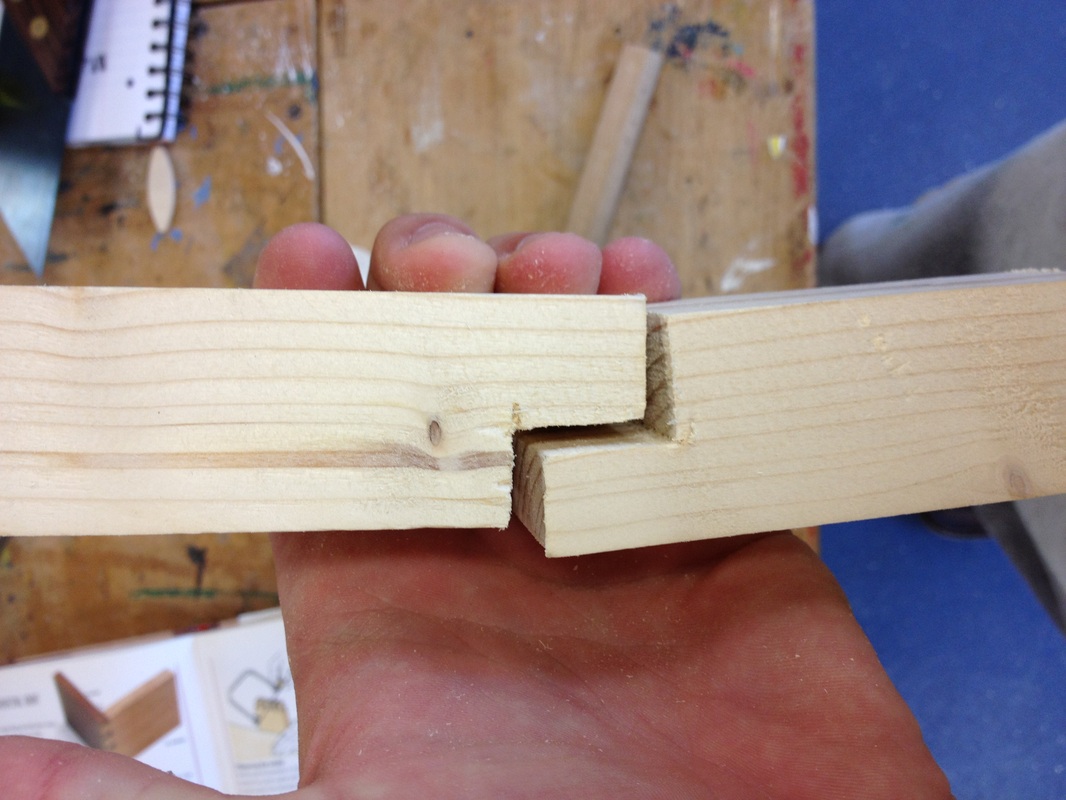
Carcase or box construction joints:
I have learnt that these types of joints are used as the corner of a piece of work. The picture here shows these examples.
I have learnt that these types of joints are used as the corner of a piece of work. The picture here shows these examples.
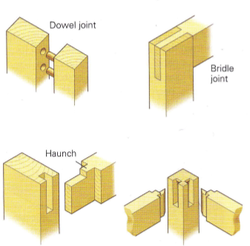
Stool construction:
I now understand that these types of joints are used when making small tables or stools and involves the joining of rails to legs.The picture shows the various examples that you tend to see when using these types of joints in your work.
I now understand that these types of joints are used when making small tables or stools and involves the joining of rails to legs.The picture shows the various examples that you tend to see when using these types of joints in your work.
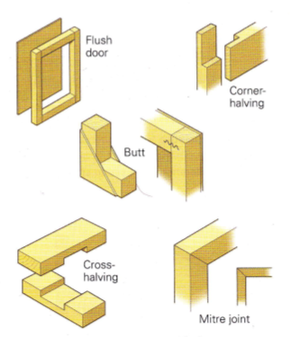
Frame construction:
I discovered that these types of joints are used to make doors with panels inserted or with manufactured board covering the frame.
I discovered that these types of joints are used to make doors with panels inserted or with manufactured board covering the frame.
Joints in Metal
I now have learnt the various joining techniques that you can use for metal. These are the following:
Soft Soldering - Used to make joints with Brass and Copper. Also used to make connections in electrical and electronic circuits. Important principle to make note of - This type of solder has a low melting point and therefore must not be used on joints that have to withstand too much heat. The joints must be cleaned and flux applied before the joint is created.
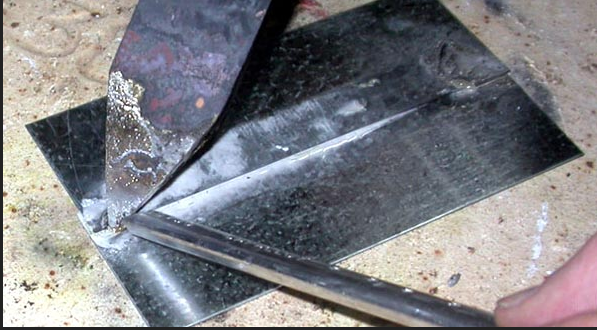
Hard Soldering - Also known as Silver soldering. These joints need to be close-fitting and clean. Several small pieces of silver solder is cut from a strip and placed on the joint. A brazing touch is used to heat the metal so that the solder runs along the joint making it strong and secure. Similar to soft soldering the joint needs to be clean with flux also being applied.
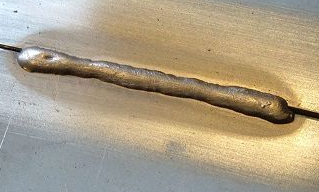
Brazing- This is used to join steel together by melting a brazing rod between the two piece of metal to be joined. The preparation is very similar to soft and hard soldering. The steel is heated, then the brazing rod is placed against the joint. The steel is then cooled without quenching.
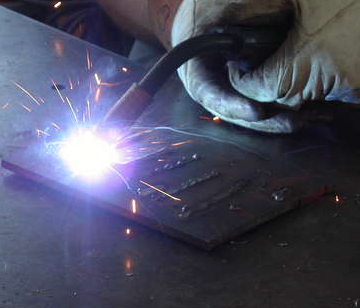
Welding- These joints are high-strength joints through extreme heat. There are two forms, oxyacetylene welding which uses oxygen ad gas to produce extreme heat through a flame, and electric arc welding which use a high electrical current through a welding electrode to carry out the welding process.
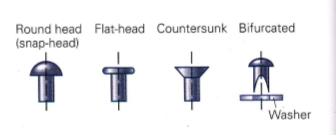
Rivets - These are quick joining techniques that fix metal sheets and thin pieces of metal. There are many types of rivets and they are used in different ways.
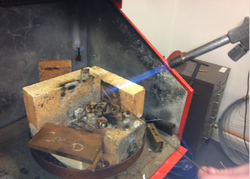
Below are a few pictures showing these types of joints at practice.
Hard Soldering - Also known as Silver soldering. These joints need to be close-fitting and clean. Several small pieces of silver solder is cut from a strip and placed on the joint. A brazing touch is used to heat the metal so that the solder runs along the joint making it strong and secure. Similar to soft soldering the joint needs to be clean with flux also being applied.
Brazing- This is used to join steel together by melting a brazing rod between the two piece of metal to be joined. The preparation is very similar to soft and hard soldering. The steel is heated, then the brazing rod is placed against the joint. The steel is then cooled without quenching.
Welding- These joints are high-strength joints through extreme heat. There are two forms, oxyacetylene welding which uses oxygen ad gas to produce extreme heat through a flame, and electric arc welding which use a high electrical current through a welding electrode to carry out the welding process.
Rivets - These are quick joining techniques that fix metal sheets and thin pieces of metal. There are many types of rivets and they are used in different ways.
Below are a few pictures showing these types of joints at practice.

Joints in plastic
Following my research in joining techniques for Wood and Metal, I have also looked into the different methods you can apply when working with Plastic. I have learnt that there are three ways in which you can join plastic together:
Rivets - same process is applied when you join metal however plastic can snap easily so caution should be taken when you do so.
Adhesives - The right glue must be used for the purpose and material
Hot-air welding- A hot-air gun is used and a filler rod to weld plastics together. The heat softens the material and the joints are prepared in the same way as when you weld with metal.
You can also design and replicate wooden style joints using CAD/CAM technology. For example finger joints are quite simple joints but are often used for making the sides of boxes.
Examples of Joins used in my work
The following images are a few examples of my work where I have used these types of joining techniques within my own projects and engagement.
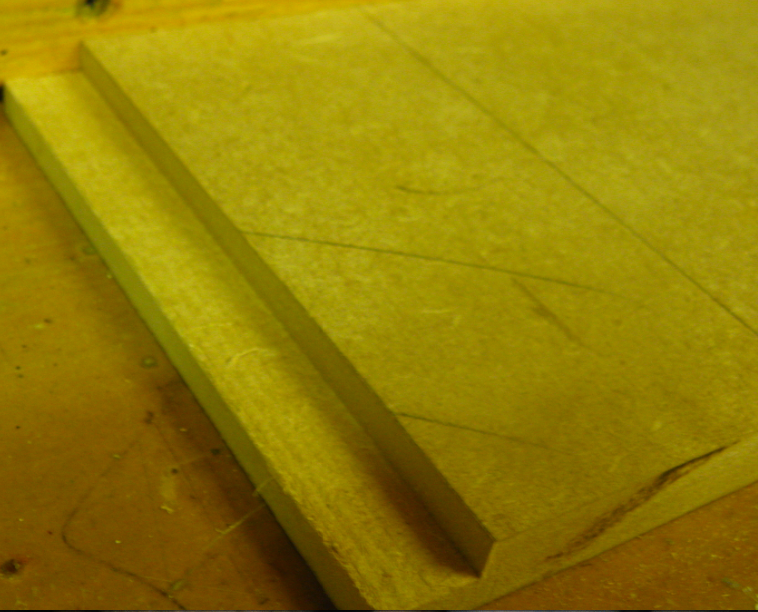
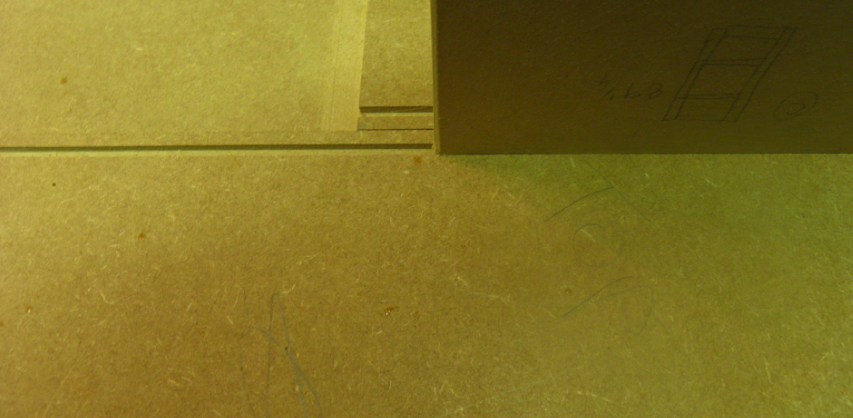
For my Design and Make cabinet I used a halving joint to hold the caucus together to create a strong bond. It made me realise that when you are marking out and constructing a joint it is so important to be accurate because you want it to the joint to be tight and a good fit. I discovered that on occasions that some joints will need something extra to make it stronger for example using adhesives or pins. In this case, I decided to glue my joints and use pins so that it enhanced the joints and created a tight fit. One important thing to make note of though which I soon realised was that I needed to conceal the holes where the pins were, to cover these holes I used filler and once dried I sanded it down so that the sides did not appear bumpy.
Once I was putting these techniques into practice I noticed that I was actually transferring some previous skills over, for example I was using my marking out skills and knowledge when I was constructing the joints - I understand now that marking out joints is a vital process to insure accuracy. Therefore, not only was I practicing these skills I was using them in different contexts. I also created grooves to fix the back panel into place, it helped me to learn that joints can actually be pretty strong without the need for glue so long as they are constructed to a high standard, another reason why accuracy is important.
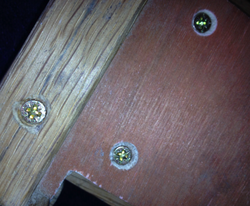
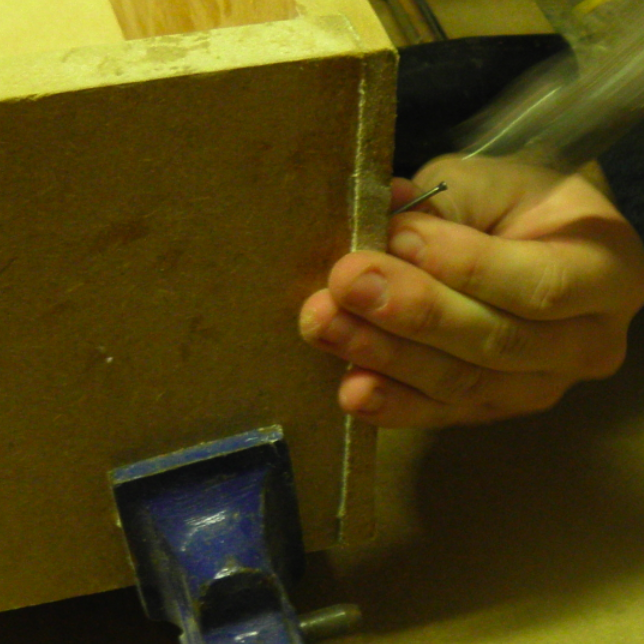
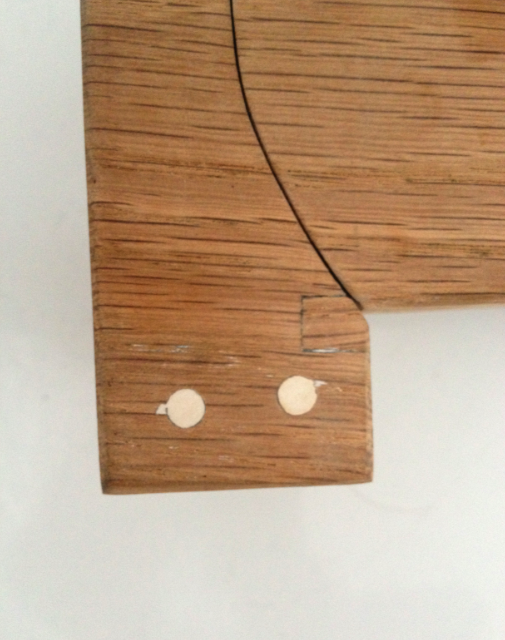
I always used more temporary joints using nails within my design innovation module. In terms of aesthetics and to demonstrate good practice I decided to create or cut a counter sink so that the head slotted into the wood nicely. When working with different types of wood I discovered and made note that some joints were easier to create and shape using softer woods compared to the harder types of timber. For example with MDF this material allowed me to easily shape the joints without having to put a huge effort in whereas with the Oak I used was, I found that it was a great deal tougher so it required much more force, but I also insured that my tools were extra sharp to help me. For this project I also used dowl joints to fix the wood together and I found that they were really quick to make and surprisingly strong, but what was important was to insure was that you drilled the correct holes according to the size of the dowel you were using, a mistake that I made at the start!
I have found and learnt that the more permanent joints are methods in which you need to be very precise and careful because often once you make a mistake it is hard to correct it without having to start again. It can also determine the strength and bond between the items you wish to fix together. Whereas with the temporary fixings of course it is important to be accurate however you can easily remove these and start again. I feel that less time goes into making joining techniques such as finger joints than it does to drill a hole for a nut and bolt to fit into.
The following images are a few examples of my work where I have used these types of joining techniques within my own projects and engagement.
For my Design and Make cabinet I used a halving joint to hold the caucus together to create a strong bond. It made me realise that when you are marking out and constructing a joint it is so important to be accurate because you want it to the joint to be tight and a good fit. I discovered that on occasions that some joints will need something extra to make it stronger for example using adhesives or pins. In this case, I decided to glue my joints and use pins so that it enhanced the joints and created a tight fit. One important thing to make note of though which I soon realised was that I needed to conceal the holes where the pins were, to cover these holes I used filler and once dried I sanded it down so that the sides did not appear bumpy.
Once I was putting these techniques into practice I noticed that I was actually transferring some previous skills over, for example I was using my marking out skills and knowledge when I was constructing the joints - I understand now that marking out joints is a vital process to insure accuracy. Therefore, not only was I practicing these skills I was using them in different contexts. I also created grooves to fix the back panel into place, it helped me to learn that joints can actually be pretty strong without the need for glue so long as they are constructed to a high standard, another reason why accuracy is important.
I always used more temporary joints using nails within my design innovation module. In terms of aesthetics and to demonstrate good practice I decided to create or cut a counter sink so that the head slotted into the wood nicely. When working with different types of wood I discovered and made note that some joints were easier to create and shape using softer woods compared to the harder types of timber. For example with MDF this material allowed me to easily shape the joints without having to put a huge effort in whereas with the Oak I used was, I found that it was a great deal tougher so it required much more force, but I also insured that my tools were extra sharp to help me. For this project I also used dowl joints to fix the wood together and I found that they were really quick to make and surprisingly strong, but what was important was to insure was that you drilled the correct holes according to the size of the dowel you were using, a mistake that I made at the start!
I have found and learnt that the more permanent joints are methods in which you need to be very precise and careful because often once you make a mistake it is hard to correct it without having to start again. It can also determine the strength and bond between the items you wish to fix together. Whereas with the temporary fixings of course it is important to be accurate however you can easily remove these and start again. I feel that less time goes into making joining techniques such as finger joints than it does to drill a hole for a nut and bolt to fit into.
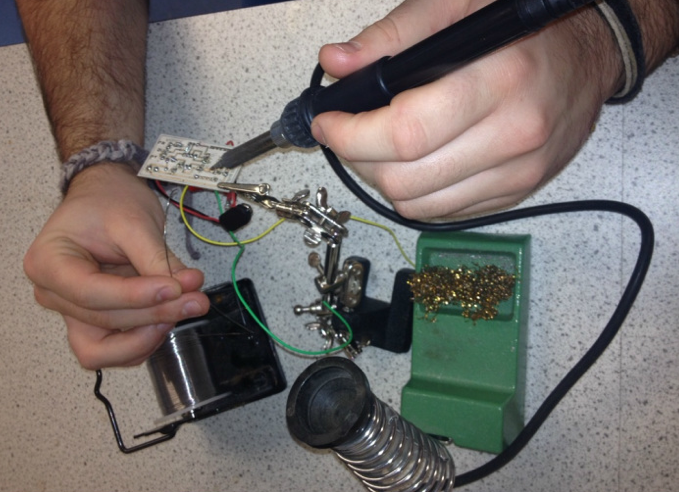
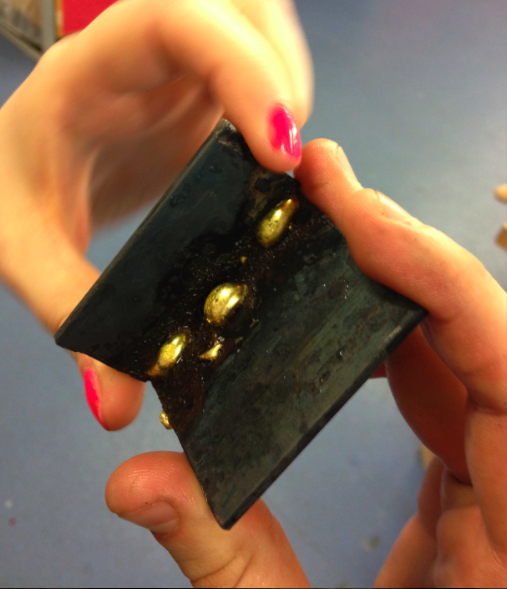
Another joining technique that I have come across this year is soldering. This type of soldering can be referred to as soft soldering and I used this process of joining within my Systems and Control module.
I realised and learnt that this type of joining technique played a vital role in the overall function of an electronic circuit. Like all of these methods I soon learnt that it was important to be accurate. You basically are joining pins to the tracks but also I learnt that you can create tracks with solder. I quickly realised as well that this type of solder had such a low melting point so you really only needed a small amount of solder applied to the tracks otherwise you would have too much on the tracks.
I have also used acrylic cement glue aka an adhesive joining technique to fix two pieces of acrylic together. It really surprised me how strong the bond or joint actually is! The glue came out really quickly so I learnt to be really gentle in my movements and if I did make any mistakes I had to be quick in correcting them because I found the glue dried really quickly. Using an adhesive was a nice quick way to create a relatively strong joint!
__________________________________________________
Analysis of research and the next step
This section of the audit was initially marked as a '1' meaning little knowledge if not any at all, I feel that this was a honest mark because now that I have had the chance to engage and learn more about this area and what it means I feel that I have certainly learnt a great deal and developed my knowledge.
During this time I have noticed that I have been quite successful as a learner and other times where I know I could have learnt more or developed my skills in a better way.
To begin with, I felt that I was successful in my learning once I realised or identified the principles within this area of the audit. I have previously mentioned that I feel it is always vital to be aware of these principles when learning new content so that it not only supports your learning but also helps you at a later stage when teaching the content to students. I purposely made note of these common principles once I was able to recognise them and looking back it has made me realise that it was certainly a successful aspect of my learning because it helped to make things clearer.
To add to this, I also was able to identify how I was transferring previous skills and knowledge whilst practicing and applying some of these joining methods within my own projects and engagement tasks. Recognising such things indicates to me that I am fully engaged with the learning and task at hand, it also demonstrates that I am thinking about previous principles that I have already learnt during the course in order to apply them within my engagement and exploration.
I felt much more comfortable learning and reading about the different types of joints when I split them into sections depending on the type of material that you were working with. It allowed me to take each piece content at a time and I feel that this technique was quite a successful approach to learn all of these methods. If I tackled them all at once it would have made me feel a bit overwhelmed and perhaps the information would not have been understood as much as it has.
In addition, I think that I have been more successful in my learning and understanding within this area of the audit when I was actually creating and practicing these types of joints with the materials. It is all well and good learning the types of joints and the processes involved through books and other sources, but I certainly learnt more once I played around and used the tools and actually applied the knowledge with the materials. It was at this point i discovered and understood that I was transferring skills and also the principles behind the processes that I was going through became obvious. This aspect of my learning is something that I have always been aware of but more so during this course, with anything practical I think it is important for me to realise this, I most likely will learn better putting these techniques and processes into practice by using the tools and materials.
During this time, I felt that I could have been more successful in my learning by exploring other types of joints in other materials. At this moment in time I have only constructed joints in woods and constructed a few examples in acrylic but in order to broaden my knowledge and skill within this section I need to address and challenge myself to construct other joining techniques.
Further more, during my time whilst constructing the joints for my projects I realised that I made the mistake of not modelling my joints before hand. For someone who has had no experience in joining techniques I should be modelling the techniques prior in order to insure accuracy. It also would help me establish any potential problems that may occur whilst using these methods. Perhaps this would have been a weaker part of my engagement and learning. I feel that I could have learnt a great deal more just by trialling the method first and as a result my joints could have been to a higher standard.
My next step in the process to further my development and understanding is basically to have a look at creating some other types of joints using plastics and metal as a material. Hopefully I will have time this year to have a go at some experiments but if not I can always look at ways of developing these within the next year.
__________________________________________________

Further development
I found this link today. I would love to make something like this perhaps in acrylic though because I am aware that we are not really supposed to be using wood in the laser cutter.
I found this link today. I would love to make something like this perhaps in acrylic though because I am aware that we are not really supposed to be using wood in the laser cutter.
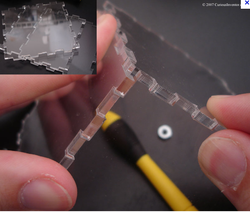
This morning I decided to have a go at this tutorial and it was actually really easy to follow and most importantly I learnt quite a few nice tricks using 2D design. I learnt a really quick process to create finger joints that were accurate and as a result will use this as a template for any future work I make. During the tutorial it also made me realise other important principles to consider when designing projects in schools - being sustainable. The person who created the tutorial set the page to a certain size and as a result it insured that you did not waste any material and kept your designs small in size.
The pictures below show my attempts of re-creating the tutorial
The pictures below show my attempts of re-creating the tutorial
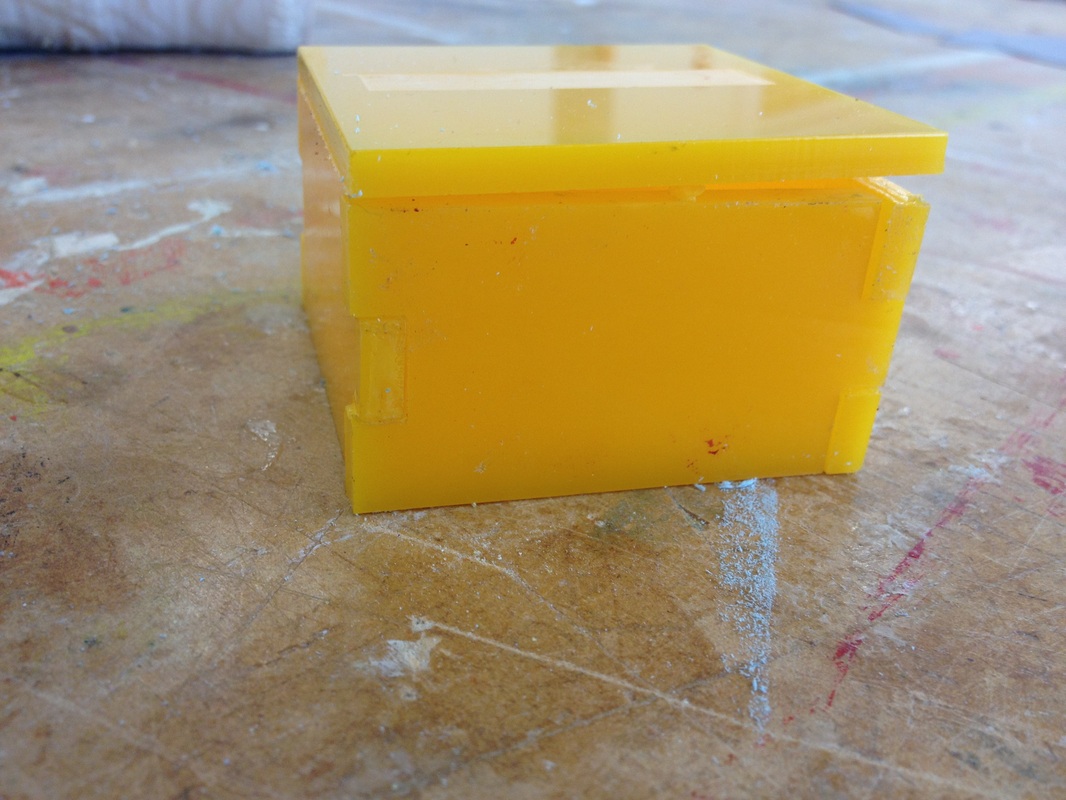
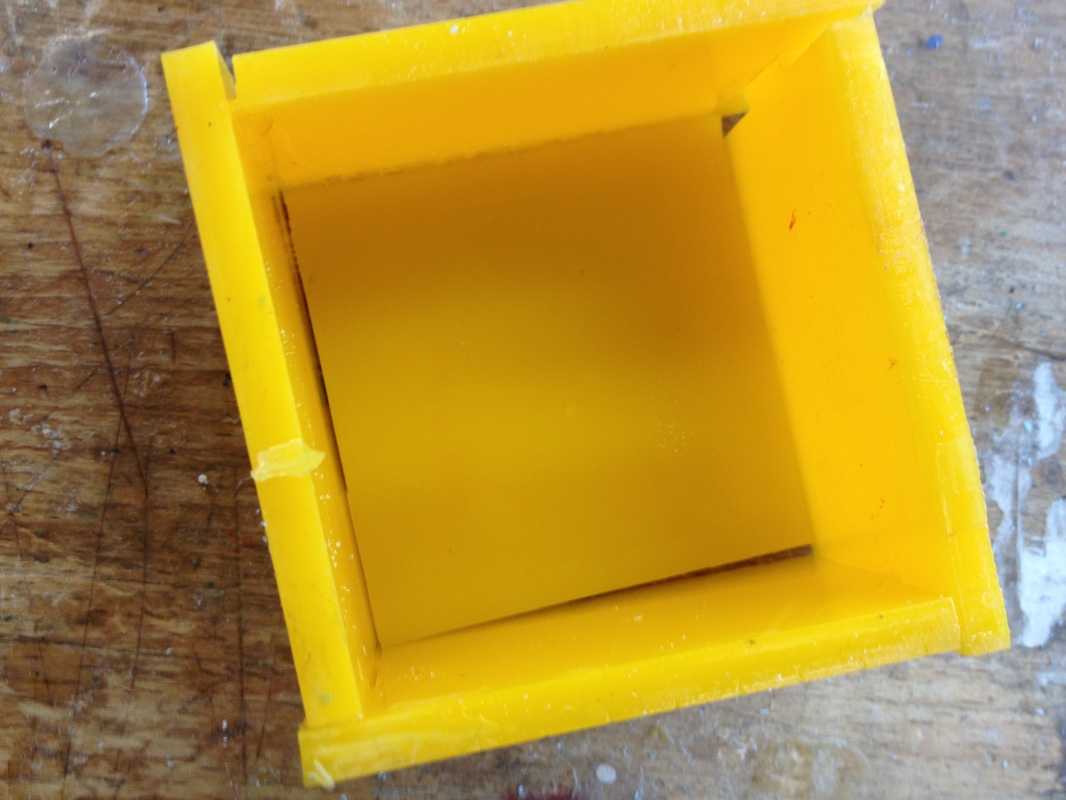
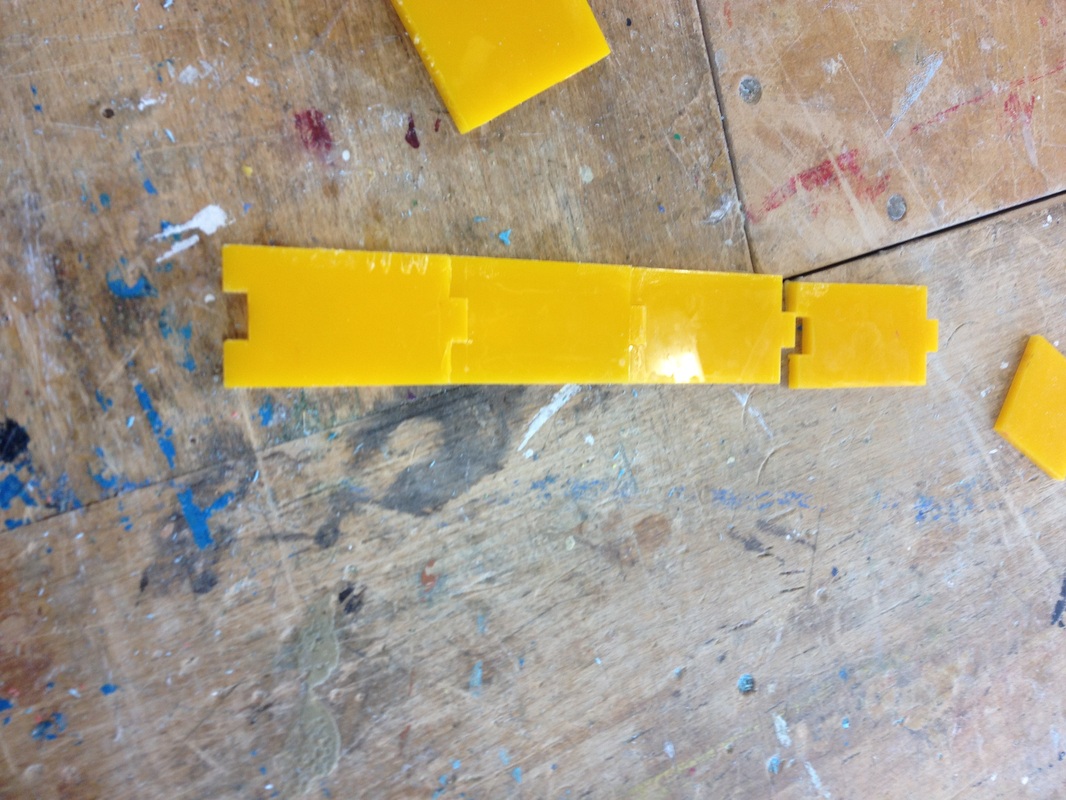
The box fitted together really well actually however the first time the laser cutter completed the cut the power was not high enough and as a result it did not cut all the way through the acrylic. Therefore, I had to re-cut it and change the settings. Once I glue the piece together it actually makes quite a nice little box and would be a great projects for students not only to develop their skills in CAD AND CAM, but also understanding joining techniques.
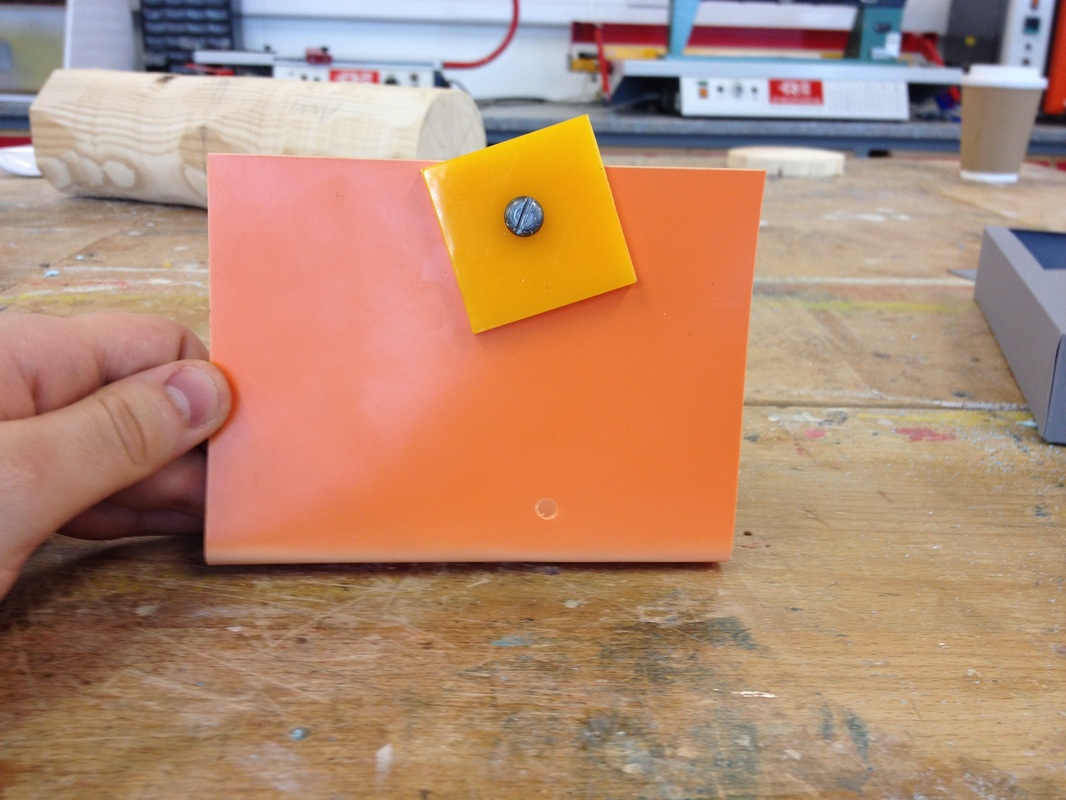
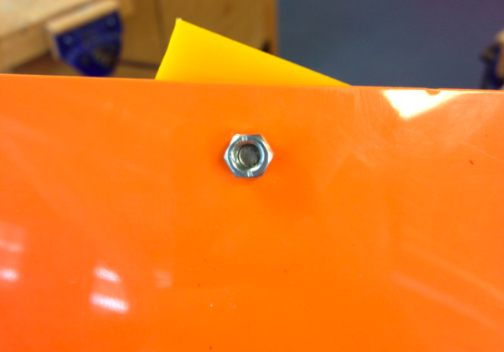
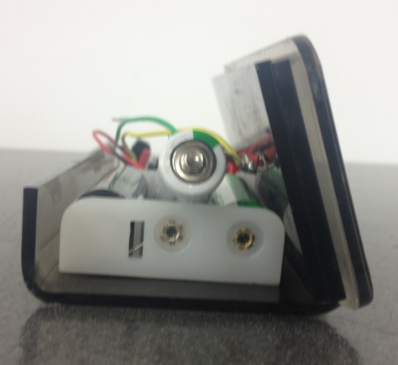
Here is another example of using joining techniques using components. This was just a practice run to get used to using nuts and bolts. I found that the join was surprisingly quite strong and firm. In drilled a through both materials at the same time using the pillar drill, to insure accuracy I insured that I measured the bold before I created the hole.
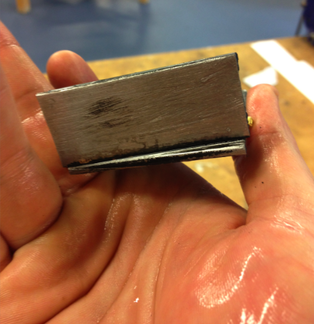
Today I had a go at experimenting some Joining techniques using metals. Please visit the following link to see what I have written about this learning process. http://benjenkins.weebly.com/r10-heat-treatment.html
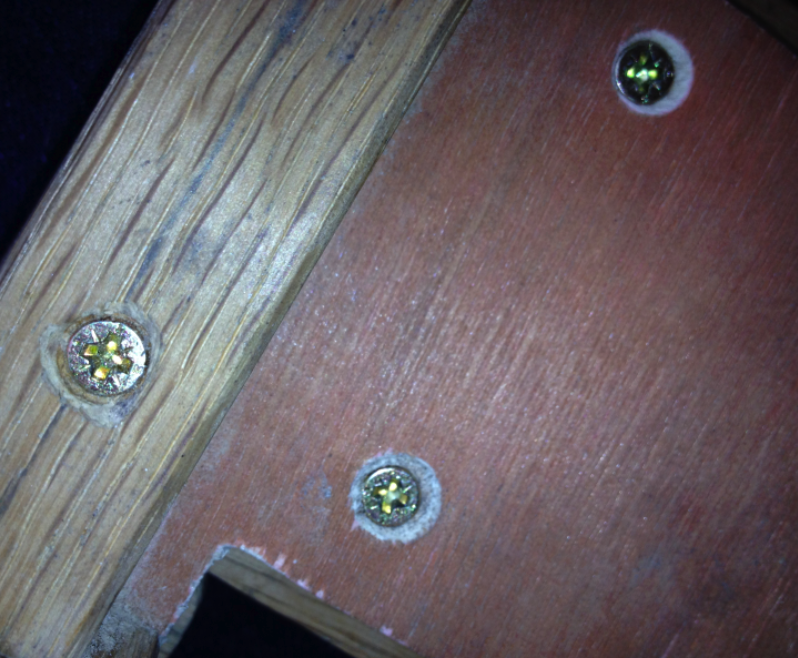
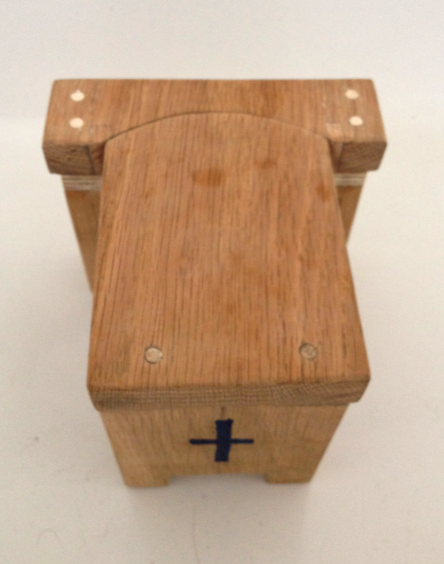
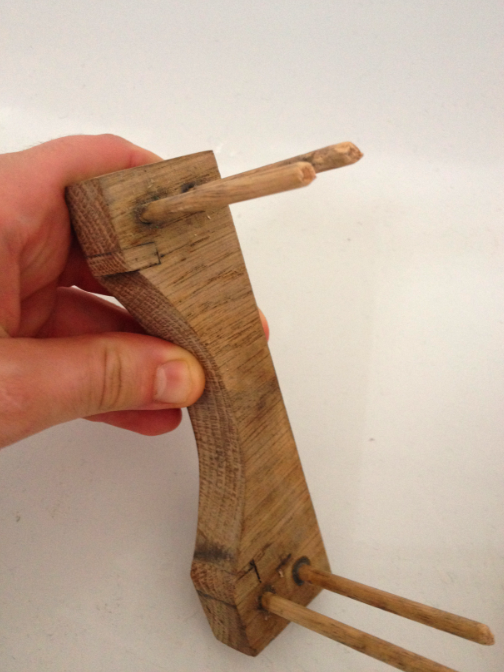
Here is an example the church chair model that I have made for my Design innovation module. These images show examples of the dowel joints that I have created. I did not realise how strong they were to be honest but they are very secure, I used a bit of glue to add to the strength but as longs you drill the right size holes for the dowel to slot into then you will have a nice fit.


Professional Year Further Development
This is an example of a finger joint box that I made during the summer. From this learning exercise it has made me realise how important it is to be accurate when marking out and cutting the material and joints.
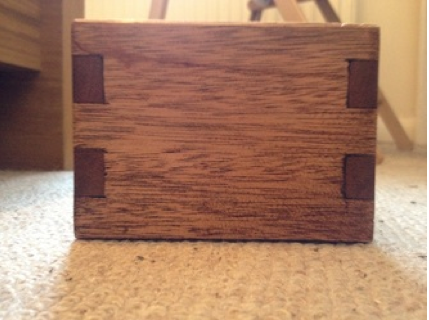
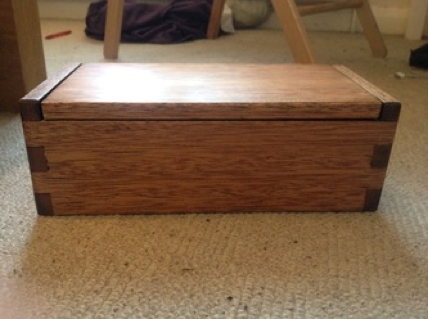
This is just a experiment that I completed in the workshop. I wanted to practice and develop my skills using joining techniques.