S12 Create fault finding, test and calibration procedures

This area of the audit has been marked at '1' meaning very little knowledge if not any at all.
___________________________________________________
___________________________________________________
What I have learnt and what I now understand
Having now completed my electronics project in semester one I am now at the stage where I have been able to develop my understanding and knowledge within this area of the audit. Not only am I now aware of how to undergo these fault finding, test and collaboration procedures I can also apprehend the importance of these processes within any systems and control project.
Whilst I was working on my electronics project quite a few times I came to the point where my circuit was not working properly. Primarily I just presumed that it was the PIC chip that I had blown having put the battery sockets round the wrong way but I soon learnt through Dean and through my own research that there are certain procedures that you go through in order to determine what the problem is with your circuit.
With any circuit that is faulty I learnt and now understand that the main reasons for the components or circuit to not respond accordingly is because of two reasons: It is either due to poor circuit design or poor construction techniques.
Poor circuit design
In terms of poor circuit design I have learnt through my research that it can be down to problems with the PBC such as;
- Porous tracks
- Fine cuts in the track result from scratches on art work
- Inverted artwork
- Tracks joined together
- Tracks too thin for current in circuit
If this is the case then you would need to go back to the PCB design on circuit wizard for example and adjust the necessarily errors and then go through the process of producing the PCB's. During my project I had no problems with poor circuit designs because the circuit was already prepared for us prior to our session, therefore this is not applicable but crucial to be aware of especially if designing a PCB in semester two.
Poor construction techniques
In regards to poor construction techniques this is where most of my problems initially occurred during my project for systems and control. I now can appreciate and have learnt that this is such an important factor to get right during the process and fundamentally can shape your project and the final results. If you do occur problems then it can really slow down the overall production process which I now know having gone through these procedures myself.
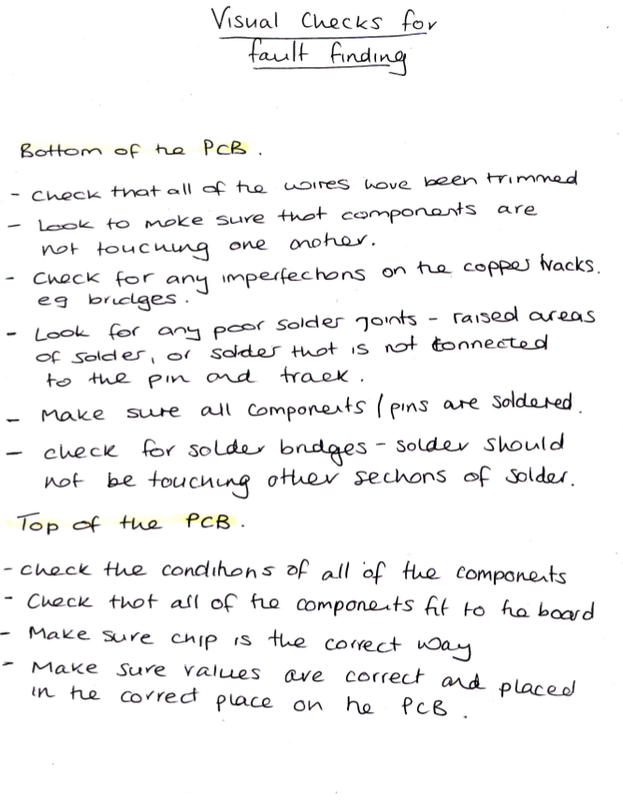
Now I have completed the project I am able to identify that there are various aspects of poor construction techniques that contribute to a circuit being faulty and as a result it is always good to complete a few checks. Dean and myself went through some of these checks when my circuit had problems, I then went away and was left to explore these produces even further. Below is an image of my notes that I have scanned in during this time of exploration - These show the procedures that I have taken and now can act as a check list from now on if or when faced with a project in systems and controls in the future.
The faults that I found in my circuit ...
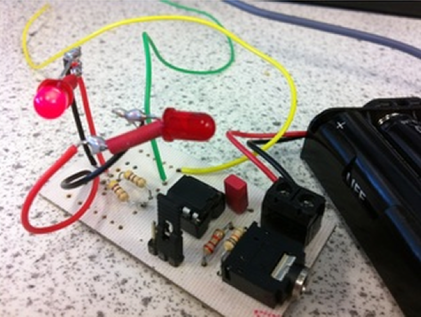
Whilst looking for faults within my circuit and going through these procedures I was able to pinpoint what I had done wrong and this was a nice learning curve for me. So although mistakes are often not your friends, I was able to learn from them and now can apply this for my next projects.
The next few bullet points just explain the problems that I had with my circuit. These are problems that I had over time not all in one go!
- Some of the components were not placed into the board properly - I saw that my Jack socket legs were not all fully inserted into the holes of the PCB.
- I had used the incorrect resistor value for my LED'S which meant that the LED would not light up.
- The 3 pin header was not on the correct inputs as well so that interfered with the program.
- Some of the components were not solder properly and therefore needed to soldered again to recreate a stronger joint.
- The plus and ground volts wires were in the wrong blocks in the two way terminal
- Some of the tracks were blocked and needed to be re soldered and cleared.
- I had number of problems with my PIC as well. I did not have it round the right way at times and also I blew it because of applying the power incorrectly.
To add to this I have also learnt and now understand that poor equipment can effect your work. Basic principles such as soldering with a clean tip and having a damp sponge to clean the tip of the iron are going to ultimately contribute to a better piece of work. I have learnt a great deal from just doing some of these checks and now that I have my notes it will be a useful aid for me in the future especially if I am to complete another project like this in semester two.
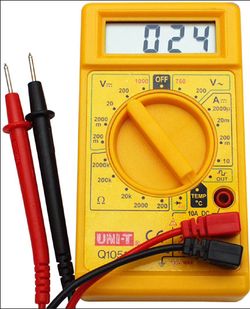
In addition, I have had the opportunity to use the multimeter as a fault finding procedure and now realise that in systems and control this tool plays a vital role and can help you in development. Dean explained the basics to me today and has showed me how to test my work. I learnt that you can use this to check the current and voltage at each stage within the circuit. It can help you find out if:
After using the multimeter I was able to identify that there were several principles that are important to abide to whilst using and testing your work.
First you must be able to choose which type of measurement you are reading. For instance voltage, current, resistance and also determine whether it is alternating or direct current. I remember Dean saying that most school based projects tend to use up 8 or 9v dc battery supply, low voltage and very low risk. In addition, choosing the highest range available for the measurement is going to help prevent and damage that could be caused to the equipment during usage. Finally, the polarity of the probes are quite an important factor and when you connect these to the correct you must insure that you are doing so correctly.
__________________________________________________
- the battery is working
- the correct voltage is reaching the right parts of the circuit
- a component has been incorrectly soldered
- there is a small crack in the circuit board
After using the multimeter I was able to identify that there were several principles that are important to abide to whilst using and testing your work.
First you must be able to choose which type of measurement you are reading. For instance voltage, current, resistance and also determine whether it is alternating or direct current. I remember Dean saying that most school based projects tend to use up 8 or 9v dc battery supply, low voltage and very low risk. In addition, choosing the highest range available for the measurement is going to help prevent and damage that could be caused to the equipment during usage. Finally, the polarity of the probes are quite an important factor and when you connect these to the correct you must insure that you are doing so correctly.
__________________________________________________
Analysis of new gained knowledge and the next step
This area of the audit was completely foreign to me when I first started the course consequently, I graded the area as a ‘1’ meaning little knowledge if not any at all. Now that I have had the chance to explore this area within our taught sessions and through my own project in systems and control I feel that I have certainly made some sort of progress and hopefully this has been shown within this area of the audit.
There were several occasions where I felt that I was rather successful in my learning and development and other times where I was not, but all in all I know that I now have new knowledge within this area of systems and controls.
During my electronics project I had quite a few problems at the beginning with my circuit, although I would never welcome such faults I think that if it wasn’t for these problems then I wouldn’t have learnt the new knowledge that I have now. I felt that my learning was successful because I was left to explore and get on with the fault finding procedures myself, Dean really helped me to begin with in fact he explained where to look and how to look for these faults which then enabled me to grasp what I needed to do. But I found that I learnt more once I went away and looked at my circuit had a play around with the multimeter and was then able to identify the different faults. This is evidence here that sometimes you do learn more by ‘playing’ rather than just reading, touching something seeing how it works and understanding the principles are all fundamental factors that have contributed to my learning progression within this time of engagement. For me as a learner I would like to take these points with me and apply them when I am learning new content throughout the year.
Looking back although I did under go fault finding procedures it took quite a long time for me to figure out what was wrong and how I could fix it. I think that this is not just due to being unfamiliar with what I was dealing with but I feel that I did not have the ability to create some sort of structure so that I was not repeating myself when going through the fault finding processes.
If I was able to have sort of check list and go through the methods step by step then I would have been quicker in my progress, but at times I found myself all over the place and going back to check the same things. Therefore, in some sense this would an unsuccessful aspect of my learning and development during this time because I now know that these procedures should not take a great amount of time up when in fact they did which overall slowed me down in my progress within the project.
My next step now in my further development within this area of the audit is to see if I can find any useful sources that can help me whilst looking for these faults within my circuit. It would be good to have these sources to reflect upon in the future if and when I am faced with a system and control project in schools or in semester two of the course.
__________________________________________________

Further Development
Now that I have progressed further in the course I have not needed to complete any fault-finding procedures within my new modules for semester two. However, along the way whilst developing and learning new areas of the audit I have come across materials and sources that can help me developed further within this area.
When I last analysis my new gained knowledge within this area of the audit I said that my next step would be to find sources that could help me during my fault finding process, as a result I will now display some examples that I have come across so far which I feel has helped my learning.

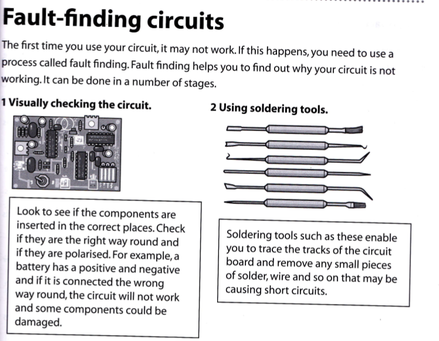
I have scanned this page from a book that I came across in the library. It is called Systems and Control and has been written by Niel Triggs. I found this quite useful to look at because it almost breaks down the steps and processes that you can undergo in order to look for such faults in your circuit. It will be something that I will most likely refer to during my career whilst teaching students the importance of this process in systems and control.
This is a YouTube video that I actually used during my systems and controls project. Although it does not necessary discuss the procedures that you take whilst looking for faults in your circuit, it can help to prevent such issues!
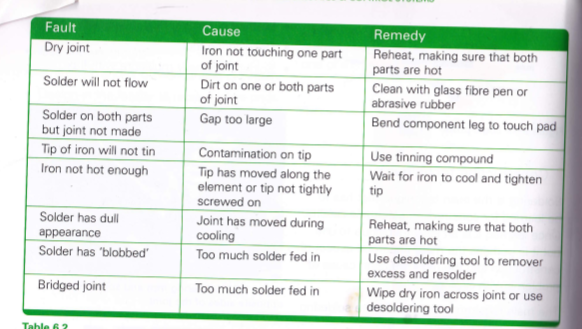
This is yet another page that I have taken and scanned from a book about systems and control. I found this in the library and it is called Electronics & control systems. I think this is a really nice table to look upon when fault finding and perhaps I could even make a similar one but expand on it for my students to look and understand. It could even be a piece of homework that I could set for my future students?